MQTT - Broker in Docker
MQTT (Message Queuing Telemetry Transport) is an open network protocol for transmitting messages between devices. An MQTT broker, like the open source Mosquitto server, is a simple solution to receive data from SmartHome devices or to control them .As an example, I use MQTT with an ESP32 microcontroller to have it send values to the MQTT broker, which can be retrieved via the MQTT integration in HomeAssistant. In addition, I use the MQTTBroker to communicate my Zigbee devices via Zigbee2MQT, see: Home-Assistant Docker Conbee 2 and Zigbee2MQTT / deCONZ
Docker Basics
A container is an isolated environment independent of the operating system (OS):
When a container is first launched, Docker independently loads all the necessary sources
from the internet.
Docker can be installed on Windows, macOS or an Linux Distribution
Those who have Docker and Docker Compose installed on their system can start the Mosquitto MQTT broker after creating the following file, for now without the config folder so that we can assign a password for MQTT:
To start MQTT using docker compose, the Docker image can be downloaded, created and started using a simple docker-compose.yml file. The file can be filled with any text editor as follows and then customized:
Filename: docker-compose.yml, Content:
version: "2"
 services:
  mosquitto:
    image: eclipse-mosquitto
    container_name: mqtt
    restart: always
    volumes:
      - ./mosquitto/data:/mosquitto/data
      - ./mosquitto/log:/mosquitto/log
    ports:
      - "1883:1883"
      - "9001:9001"
The example uses Docker volumes and not bind mounts to permanently store data. See: Docker data storage: Docker Volumes vs. Host Folders
docker compose up starts the container:
docker compose upAttention the folder /mosquitto/config and therefore the config file: mosquitto.conf is still missing in the docker-compose file for now.This is initially created at startup and is only located inside the container, so all settings would be lost when the container is restarted. At this point, the container already works with the default settings, but allows all devices to communicate with the broker without a password:
c:\temp\mosquitto>docker compose up
Recreating mqtt ... done
Attaching to mqtt
mqtt         | 1642331896: mosquitto version 2.0.14 starting
mqtt         | 1642331896: Config loaded from /mosquitto/config/mosquitto.conf.
mqtt         | 1642331896: Starting in local only mode. Connections will only be possible from clients running on this machine.
mqtt         | 1642331896: Create a configuration file which defines a listener to allow remote access.
mqtt         | 1642331896: For more details see https://mosquitto.org/documentation/authentication-methods/
mqtt         | 1642331896: Opening ipv4 listen socket on port 1883.
mqtt         | 1642331896: Opening ipv6 listen socket on port 1883.
mqtt         | 1642331896: Error: Address not available
mqtt         | 1642331896: mosquitto version 2.0.14 running
So that we can assign a password for MQTT and the settings remain after restarting the container, I connected into the container and created a password file in it:
c:\temp\mosquitto> docker exec -it mqtt sh
/ # mosquitto_passwd -b -c passwd mqttuser myMQTTPassword
/ # cat passwd
mqtt:???x
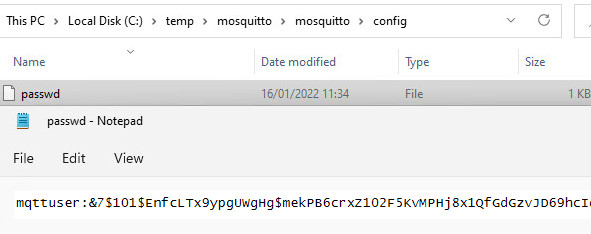
The contents of the output mqttuser:??? can then be put into the passwd file in the /config folder:

Then another new file with the configuration: mosquitto.conf with the following content:
port 1883
listener 9001
protocol websockets
persistence true
persistence_location /mosquitto/data
allow_anonymous false
password_file /mosquitto/config/passwd
Afterwards, the Docker container can be stopped, the /mosquitto/config folder can be added and started again:

Adjustments to the docker-compose.yml file: Addition of /config:
version: "2"
services:
  mosquitto:
    image: eclipse-mosquitto
    container_name: mqtt
    restart: always
    volumes:
      - ./mosquitto/config:/mosquitto/config
      - ./mosquitto/data:/mosquitto/data
      - ./mosquitto/log:/mosquitto/log
    ports:
      - "1883:1883"
      - "9001:9001"
Restarting the container uses the created configuration and the assigned password:
A look into the output of the container (docker logs) shows us the successful start:
c:\temp\mosquitto>docker logs mqtt -f
1642333000: mosquitto version 2.0.14 starting
1642333000: Config loaded from /mosquitto/config/mosquitto.conf.
1642333000: Opening websockets listen socket on port 9001.
1642333000: Opening ipv4 listen socket on port 1883.
1642333000: Opening ipv6 listen socket on port 1883.
1642333000: mosquitto version 2.0.14 running
For an integration with Home Assistant, see: Home Assistant integrations
Display of connections: Logs
In the Docker logs, the connection of individual devices can be observed:
docker logs mqtt -f1641494340: New connection from 172.22.0.4:44135 on port 1883.
1641494340: New client connected from 172.22.0.4:44135 as ?????? (p2, c1, k60, u'mqtt').
1641494608: Client ??? closed its connection.
1641496053: Saving in-memory database to /mosquitto/data/mosquitto.db.Services that use the MQTT broker
ESP32 MQTT - Send data
To be able to receive data from an ESP32, I have prepared an MQTT broker as a Docker container . The container can be integrated into Home-Assistant and thus forward the data from the ESP32 to Home-Assistant via MQTT. On the part of ESP32, I tested sending with the following sketch and later integrated the relevant parts into another sketch. ... continue reading
 ({{pro_count}})
{{percentage}} % positive
 ({{con_count}})