Docker Container GUI graphical web interface with Portainer

Originally, I managed Docker purely via the command line, which is already very simple with a few simple commands. Portainer provides even more overview and a comfortable admin interface. Portainer itself can also be started as a Docker container and makes managing Docker containers a breeze.
Software
| Software | Portainer |
|---|---|
| GitHub | https://github.com/portainer/portainer |
| current version | 2.39.0 |
| found | 2026-03-02 |
Access from the Internet
Docker Basics
Docker allows applications to be launched by command in a so-called container.A container is an isolated environment independent of the operating system (OS):
When a container is first launched, Docker independently loads all the necessary sources
from the internet.
Docker can be installed on Windows, macOS or an Linux Distribution
To ensure that Portainer is can be reached securely from the Internet, I use a Let's Encrypt reverse proxy. At first I used Nginx as Reverse-Proxy, but later replaced it with Traefik. The reverse proxy provides an encrypted HTTPS connection and makes it possible to run multiple websites on one server.
Step by step Portainer and Docker including access from the internet
Hardware requirement:- Almost any hardware can be used for the Docker installation. For example, a virtual server of a provider, or for home: a Mini-PC, notebook, MAC, a NAS: QNAP, Synology or any other hardware with x68-64 architecture on which Windows or Linux can be installed.
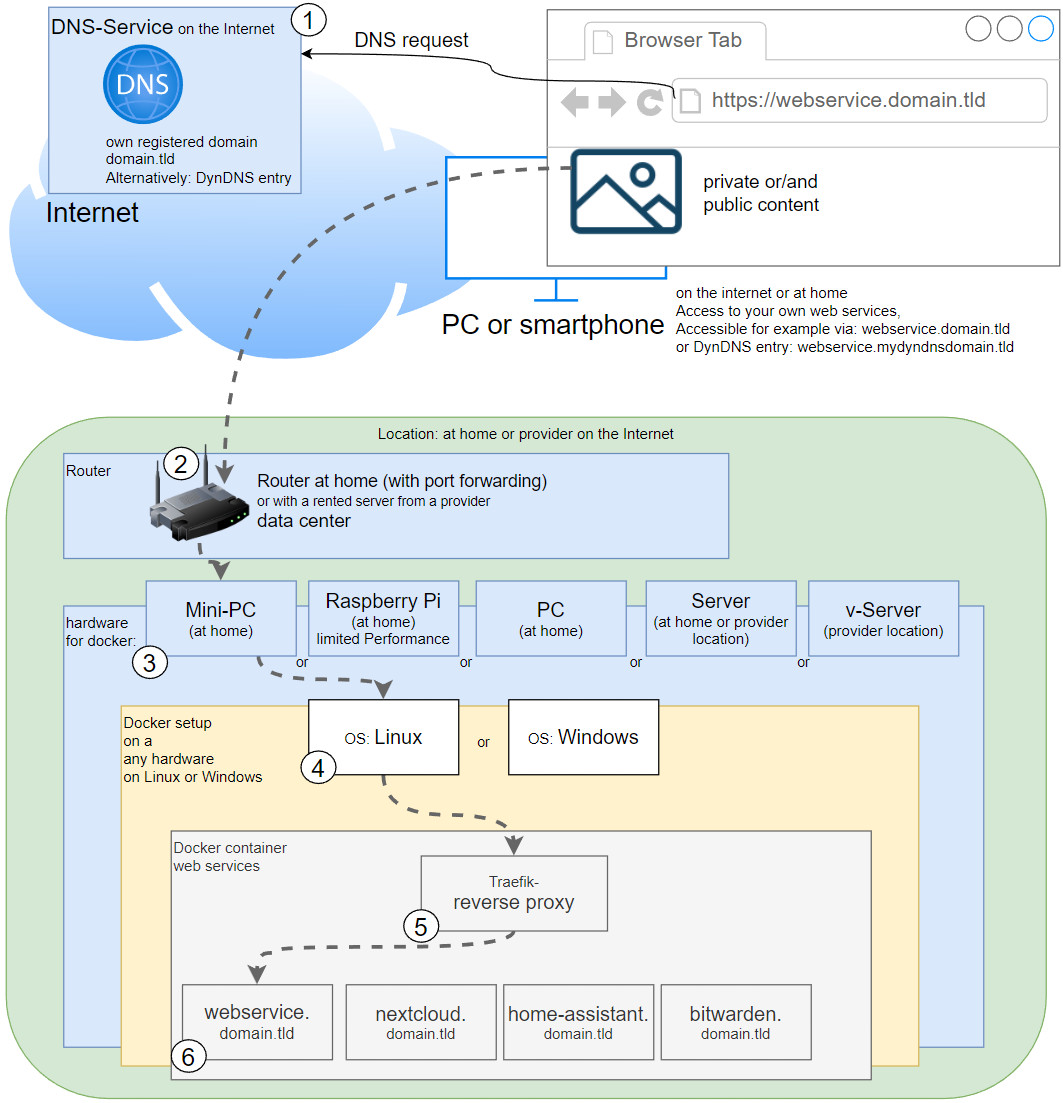
Schematic representation: Access from the Internet
- Own registered domain, see domain and its management.
- Cloudflare or Reverse Proxy:
- Cloudflare Tunnel Service or alternatively:
- Port forwarding and Reverse proxy with Let's Encrypt certificate
- Create and customize docker-compose.yml
- Start container and
- Setup
Setup
To start Portainer using docker compose, the official Docker Portainer image can be used. The image can be downloaded, created and started by the help of a simple docker-compose.yml file. The file can be filled with any text editor as follows and then customized:
Filename: docker-compose.yml, Content:
services:
  portainer:
    image: portainer/portainer-ce:latest
    volumes:
      - /var/run/docker.sock:/var/run/docker.sock
      - ./data:/data
   #For direct test access, remove "#" in the following 2 lines. Call: http://localhost:9000 or http://ServerIP:9000
    #ports:
      #- "9000:9000"
    #Labels for ReverseProxy, see: https://www.libe.net/en-traefik
    labels:
      - "traefik.enable=true"
      - "traefik.http.routers.portainer.rule=Host(`portainer.domain.tld`)"
      - "traefik.http.routers.portainer.entrypoints=websecure"
      - "traefik.http.routers.portainer.tls.certresolver=myresolver"
      - "traefik.http.services.portainer.loadbalancer.server.port=9000"
      - "traefik.http.routers.portainer.service=portainer"

#Without using a reverse proxy (https://www.libe.net/en-traefik) the webproxy network is likely to be missing
#and the following lines can be removed or commented out. Alternatively, the network can be created with "docker network create webproxy".
networks:
  default:
    name: webproxy
    external: true
For direct access via IP address or localhost - even without reverse proxy, DNS or public IP - the commented out port setting can be activated for test purposes:
...
   #Für einen direkten Test-Zugriff, in den folgenden 2 Zeilen "#" entfernen. Aufruf: http://localhost:9000 oder http://ServerIP:9000
    ports:
      - "9000:9000"
...
To access from the Internet via Traefik Reverse Proxy, the domain must be replaced in the labels with the previously created DNS records (in the example: portainer.domain.tld).
The example uses bind mounts and not docker volumes to permanently store data. See: Docker data storage: Docker Volumes vs. Host Folders
Start Portainer
The start is done from the folder of the docker-compose.yml file with the command""docker compose up":
docker compose up -dAdministration
When calling the specified domain(https://portainer.domain.tld) ,the Portainer setup reports. When testing on your own computer and activating port 9000, the call can also be made directly without the Internet via the URLs http://localhost:9000 or http://ServerIP:9000.

By mapping /var/run/docker.sock into the container as a volume in the docker-compose-yml file, Portainer can read and manage all containers.
Existing Docker containers in Portainer.
If the containers are created outside of Portainer, their Conrol: is "Limited" and not all actions are available:

The container for Portainer itself is logically a container created outside Portainer, since Portainer is not available before launch ...
However, starting or stopping the containers, opening the logs or looking at the console is also possible with “Limited”.
Creating new containers
New containers can be created in Portainer using prepared app templates, e.g: WordPress, Joomla or Drupal:
In addition, any stack can be created via a docker-compose file:
As an example, see also WordPress in Docker incl. HTTPS Let’s Encrypt setup
 ({{pro_count}})
{{percentage}} % positive
 ({{con_count}})