Nextcloud Server Docker | Setup + https: Let's Encrypt [ssl]
![Preview Nextcloud Server Docker | Setup + https: Let's Encrypt [ssl]](/storage/300x202/6273d03c721b0.webp)
To synchronize contacts, appointments, and photos of my NAS, I tested Nextcloud and thus turned my back on other cloud providers for my private data. Thanks to Docker, the installation is easier and more flexible than ever and allows Nextcloud to run on almost any hardware.
Nextcloud server profile:
| Software | Server |
|---|---|
| GitHub | https://github.com/nextcloud/server |
| current version | 31.0.4 |
| found | 2025-05-01 |
Docker Basics
Docker allows applications to be launched by command in a so-called container.A container is an isolated environment independent of the operating system (OS):
When a container is first launched, Docker independently loads all the necessary sources
from the internet.
Docker can be installed on Windows, macOS or an Linux Distribution
To ensure that Nextcloud is can be reached securely from the Internet, I use a Let's Encrypt reverse proxy. At first I used Nginx as Reverse-Proxy, but later replaced it with Traefik. The reverse proxy provides an encrypted HTTPS connection and makes it possible to run multiple websites on one server.
Step by step Nextcloud and Docker including access from the internet
Hardware requirement:- Almost any hardware can be used for the Docker installation. For example, a virtual server of a provider, or for home: a Mini-PC, notebook, MAC, a NAS: QNAP, Synology or any other hardware with x68-64 architecture on which Windows or Linux can be installed.
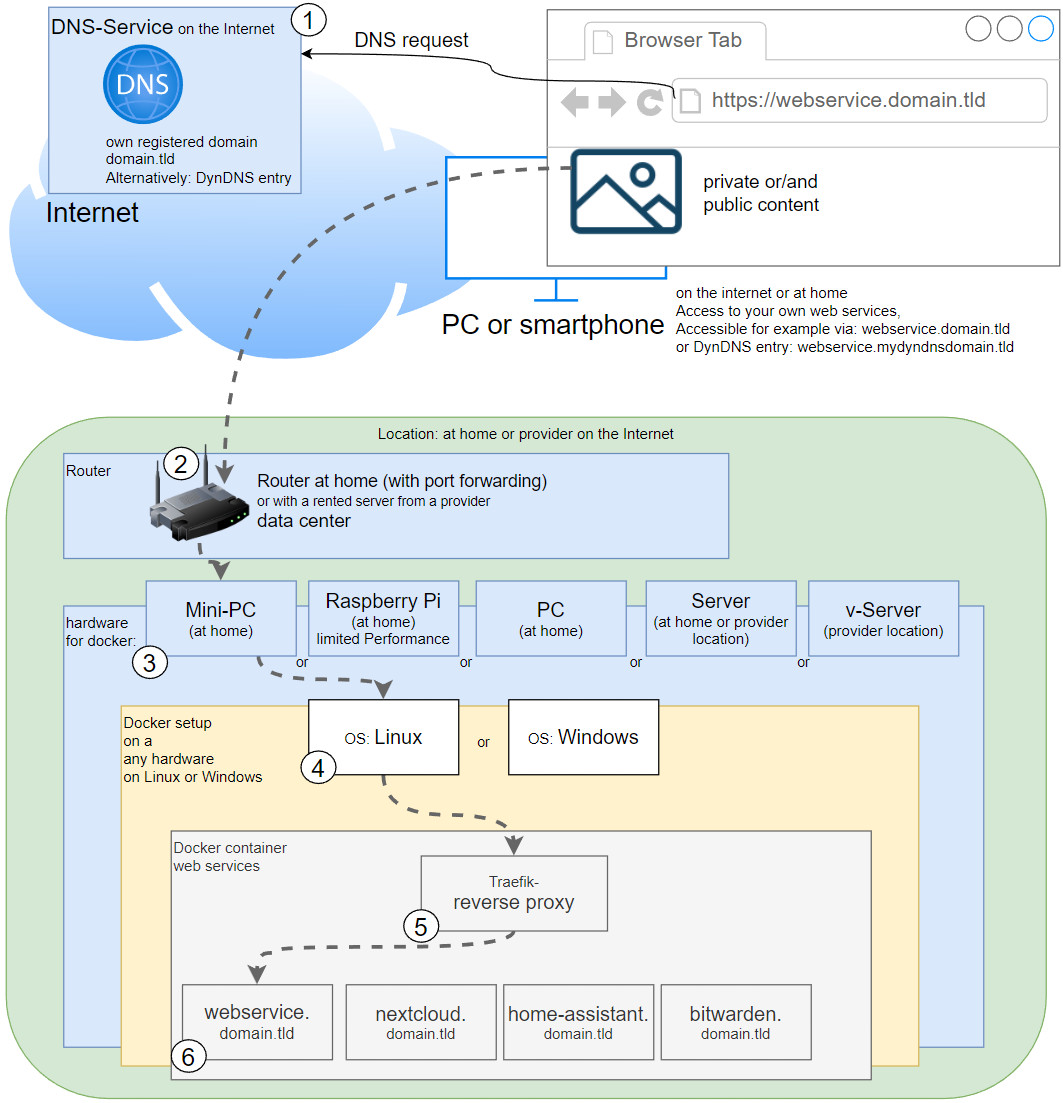
Schematic representation: Access from the Internet
- Own registered domain, see domain and its management.
- Cloudflare or Reverse Proxy:
- Cloudflare Tunnel Service or alternatively:
- Port forwarding and Reverse proxy with Let's Encrypt certificate
As a basis for Nextcloud I originally used the following GitHub project and later adapted it: https://github.com/ichiTechs/Dockerized-SSL-NextCloud-with-MariaDB . The project basically consists of two files, which I describe in adapted version here. The main reason for the adaptation was to separate the reverse proxy from the Nextcloud setup, allowing multiple web services to run with a respective SSL certificate. The Nextcloud installation is running on hardware in my case, at my home.
Container for Nextcloud:
docker-compose.yml
The docker-compose.yml file contains the configuration for the containers, such as the database user, domain, and network settings for the individual containers to communicate with each other. The file should be customized accordingly before the first launch (labels= section). As mentioned earlier, the setup described here requires a DNS entry on the IP of the Nextcloud installation in addition to Docker and the Traefik reverse proxy.
Content of the file: docker-compose.yml
services:
  web:
    image: nginx
    container_name: nextcloud_webserver
    volumes:
      - ./nginx.conf:/etc/nginx/nginx.conf:ro
    links:
      - app
    volumes_from:
      - app
   #For direct test access, remove "#" in the following 2 lines. Call: http://localhost:83 or http://ServerIP:83
    #ports:
      #- "83:80"
    #Labels for ReverseProxy, see: https://www.libe.net/en-traefik
    labels:
      - "traefik.enable=true"
      - "traefik.http.routers.next.rule=Host(`next.domain.tld`)"
      - "traefik.http.routers.next.entrypoints=web"
      - "traefik.http.routers.next.entrypoints=websecure"
      - "traefik.http.routers.next.tls.certresolver=myresolver"
    networks:
      - nextcloud
    restart: always
  app:
    image: nextcloud:fpm
    container_name: nextcloud_fpm
    links:
      - db
      - redis
    volumes:
      - ./apps:/var/www/html/apps
      - ./config:/var/www/html/config
      - ./data:/var/www/html/data
    networks:
      - nextcloud
    restart: always
  redis:
    image: redis
    container_name: nextcloud_redis
    restart: always
    ports:
      - "6379:6379"
    volumes:
      - ./redis:/data
    entrypoint: redis-server --appendonly yes
    networks:
      - nextcloud
    restart: always
  db:
    image: mariadb:10.5
    container_name: nextcloud_db
    volumes:
      - ./db:/var/lib/mysql
    environment:
      - MYSQL_ROOT_PASSWORD=???
      - MYSQL_DATABASE=nextcloud
      - MYSQL_USER=nextcloud
      - MYSQL_PASSWORD=???
    networks:
      - nextcloud
    restart: always

#Without using a reverse proxy (https://www.libe.net/en-traefik) the webproxy network is likely to be missing
#and the following lines can be removed or commented out. Alternatively, the network can be created with "docker network create webproxy".
networks:
  nextcloud:
    name: webproxy
    external: true
The file does not use volumes, but subfolders below the docker-compose.yml file. See: Docker data storage: Docker Volumes vs. Host Folders. Additionally, a nginx config file is referenced in the docker-compose file, this is expected in the same folder:
nginx.conf
The following example can be used as the content for the nginx.conf file: https://github.com/nextcloud/docker/blob/master/.examples/docker-compose/with-nginx-proxy/mariadb/fpm/web/nginx.conf
Creating the config and starting the containers
The following command creates the containers with the config stored in docker-compose.yml.
docker compose up -d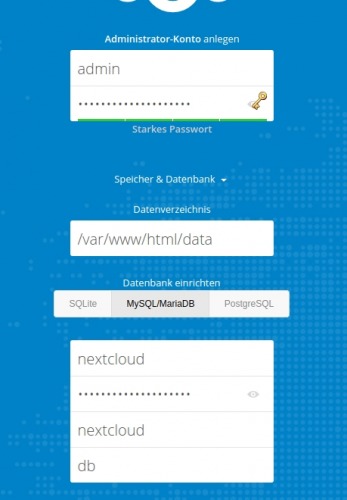
Add container / customize docker-compose.yml
Add Collabora
Collabora is an online version of LibreOffice and allows creating or collaborate on Office documents online via the web browser. Prerequisite for the use from the Internet is an additional DNS name, i.e., an A-record to the public IP of the server and an additional Let's Encrypt certificate. The certificate is again defined via the environment variables can and automatically issued and renewed by the Traefik reverse proxy.
To use Callabora in Nextcloud, the following block can be customized and inserted in docker-compose.yml:
collabora:
 image: collabora/code
 container_name: nextcloud_collabora
 expose:
 - 9980
 cap_add:
 - MKNOD
 environment:
 - domain=next.deineDomain
 - VIRTUAL_HOST=office.deineDomain
 - VIRTUAL_NETWORK=nginx-proxy
 - VIRTUAL_PORT=9980
 - VIRTUAL_PROTO=https
 - LETSENCRYPT_HOST=office.deineDomain
 - LETSENCRYPT_EMAIL=deineEmail-Addresse
 networks:
 - nextcloud
 restart: always
The configuration for Collabora was only tested with the Nginx-LetsEncrypt reverse proxy, therefore the reverse proxy setting is in the environment section and not in the labels section
Add OnlyOffice
In addition, Word, Excel or PowerPoint documents can be edited online with Only-Office. Here, too ,an additional DNS name is required for access from the Internet : Traefik Reverse Proxy. Compared to Collabora, Only-Office is a bit more streamlined, since much more program logic takes place in the browser. Compared to Collabora, I have not had any disconnections when editing documents with OnlyOffice, so I have replaced Collabora with OnlyOffice in the meantime.
  onlyoffice:
     image: onlyoffice/documentserver
     container_name: nextcloud_onlyoffice
     stdin_open: true
     tty: true
     volumes:
        - ./onlyoffice/data:/var/lib/onlyoffice/documentserver/App_Data
     expose:
        - '80'
        - '443'
     labels:
      - "traefik.enable=true"
      - "traefik.http.routers.document.rule=Host(`document.domain.tld`)"
      - "traefik.http.routers.document.entrypoints=web"
      - "traefik.http.routers.document.entrypoints=websecure"
      - "traefik.http.routers.document.tls.certresolver=myresolver"
      - "traefik.http.middlewares.document-headers.headers.accesscontrolalloworiginlist=*"
      - "traefik.http.middlewares.document-headers.headers.customrequestheaders.X-Forwarded-Proto=https"
      - "traefik.http.routers.document.middlewares=document-headers"
     environment:
        - JWT_ENABLED=true
        - JWT_SECRET=mysecret
        - JWT_HEADER=Authorization
     networks:
        - nextcloud
     restart: always
Customized docker-compose.yml with OnlyOffice
version: '2'

services:
  web:
    image: nginx
    container_name: nextcloud_webserver
    volumes:
      - ./nginx.conf:/etc/nginx/nginx.conf:ro
    links:
      - app
    volumes_from:
      - app
    labels:
      - "traefik.enable=true"
      - "traefik.http.routers.next.rule=Host(`next.domain.tld`)"
      - "traefik.http.routers.next.entrypoints=web"
      - "traefik.http.routers.next.entrypoints=websecure"
      - "traefik.http.routers.next.tls.certresolver=myresolver"
    networks:
      - nextcloud
    restart: always
  app:
    image: nextcloud:fpm
    container_name: nextcloud_fpm
    links:
      - db
      - redis
      - onlyoffice
    volumes:
      - ./apps:/var/www/html/apps
      - ./config:/var/www/html/config
      - ./data:/var/www/html/data
    networks:
      - nextcloud
    restart: always
  redis:
    image: redis
    container_name: nextcloud_redis
    restart: always
    ports:
      - "6379:6379"
    volumes:
      - ./redis:/data
    entrypoint: redis-server --appendonly yes
    networks:
      - nextcloud
    restart: always
 onlyoffice:
     image: onlyoffice/documentserver
     container_name: nextcloud_onlyoffice
     stdin_open: true
     tty: true
     volumes:
        - ./onlyoffice/data:/var/lib/onlyoffice/documentserver/App_Data
     expose:
        - '80'
        - '443'
     labels:
      - "traefik.enable=true"
      - "traefik.http.routers.document.rule=Host(`document.domain.tld`)"
      - "traefik.http.routers.document.entrypoints=web"
      - "traefik.http.routers.document.entrypoints=websecure"
      - "traefik.http.routers.document.tls.certresolver=myresolver"
      - "traefik.http.middlewares.document-headers.headers.accesscontrolalloworiginlist=*"
      - "traefik.http.middlewares.document-headers.headers.customrequestheaders.X-Forwarded-Proto=https"
      - "traefik.http.routers.document.middlewares=document-headers"
     environment:
        - JWT_ENABLED=true
        - JWT_SECRET=mysecret
        - JWT_HEADER=Authorization
     networks:
        - nextcloud
     restart: always
  db:
    image: mariadb:10.5
    container_name: nextcloud_db
    volumes:
      - ./db:/var/lib/mysql
    environment:
      - MYSQL_ROOT_PASSWORD=???
      - MYSQL_DATABASE=nextcloud
      - MYSQL_USER=nextcloud
      - MYSQL_PASSWORD=???
    networks:
      - nextcloud
    restart: always
networks:
  nextcloud:
    external:
      name: webproxy
OnlyOffice empty documents
ATTENTION: If the address for the internal requests cannot be resolved, the documents will not be updated in NextCloud, they will still be in the container, in the folder: /var/lib/onlyoffice/documentserver/App_Data. For this reason, the folder should definitely be mapped to a local folder to avoid data loss. Responsible for updating the Only-Office documents in NextCloud is the cron job, so it is also important that it runs regularly.
I also had to add the following lines in the Nextcloud config starting from a certain version:
File: /config/config.php
$CONFIG = array (
...
  'onlyoffice' =>
  array (
    'verify_peer_off' => false,
  ),
...
In addition, I have also selected the option Keep intermediate versions during editing (force save).

OnlyOffice Unknown error
After switching from Nginx-LetsEncrypt Reverse Proxy to Traefik, I had the following problem when calling documents: Unknown error. Press "OK" to reterun to document list

The cause was missing headers. In Traefik, these can be adjusted via middleware. The middleware is already inserted in the example above.
...
      - "traefik.http.middlewares.document-headers.headers.accesscontrolalloworiginlist=*"
      - "traefik.http.middlewares.document-headers.headers.customrequestheaders.X-Forwarded-Proto=https"
      - "traefik.http.routers.document.middlewares=document-headers"
...
Maintenance
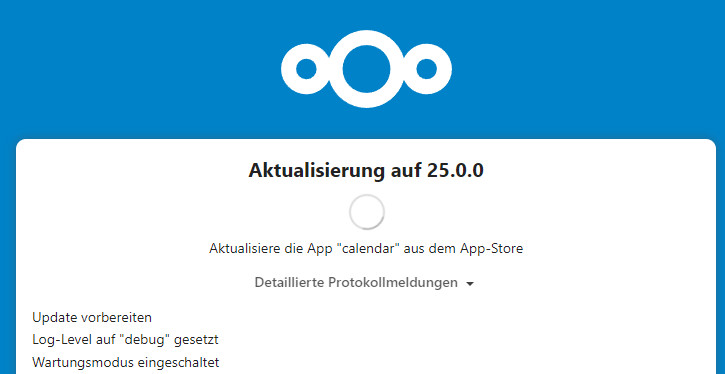
Update container
For the update of the container I wrote myself a small .sh file:
docker-compose pull
docker compose up -d
sleep 20

docker exec --user www-data nextcloud_fpm php occ upgrade
sleep 20
docker exec --user www-data nextcloud_fpm php occ db:add-missing-indices
docker exec --user www-data nextcloud_fpm php occ app:disable twofactor_totp calendar news contacts onlyoffice previewgenerator tasks mail drawio
docker exec --user www-data nextcloud_fpm php occ app:enable twofactor_totp calendar news contacts onlyoffice  previewgenerator tasks mail drawio
docker exec --user www-data nextcloud_fpm php occ maintenance:mode --off
~
After apps were missing from time to time, I first deactivated them in the script and then reactivated them.
Without the "occ upgrade" command, the upgrade would be initiated the next time the web interface was called via the browser:
scan files
If files are added directly and not via the Nextcloud web interface, they can be detected and added via filescan:
docker exec --user www-data nextcloud_fpm php occ files:scan --allFace recognition
App:


docker exec --user www-data nextcloud_fpm php occ recognize:download-modelsrebuild birthday calendar
docker exec --user www-data nextcloud_fpm php occ dav:sync-birthday-calendar Userbackup: database dump
docker exec db mysqldump --user=root --password=password -h localhost nextcloud > dump.sql.gzMariaDB upgrade
After upgrading the containers, you may also want to take a look at the respective console outputs. As an example, a note was displayed in the database for the upgrade to a newer version:
[Warning] InnoDB: Table mysql/innodb_index_stats has length mismatch in the column name table_name.  Please run mysql_upgrade
[Warning] InnoDB: Table mysql/innodb_table_stats has length mismatch in the column name table_name.  Please run mysql_upgrade
With the command "mysql_ugrade -u root -p" in the DB container I was able to upgrade the database to a newer version:
root@71fb96934128:/# mysql_upgrade -u root -p
Enter password:
Phase 1/7: Checking and upgrading mysql database
Processing databases
mysql
mysql.column_stats                                 OK
mysql.columns_priv                                 OK
mysql.db                                           OK
mysql.event                                        OK
mysql.func                                         OK
mysql.gtid_slave_pos                               OK
mysql.help_category                                OK
mysql.help_keyword                                 OK
mysql.help_relation                                OK
mysql.help_topic                                   OK
mysql.host                                         OK
mysql.index_stats                                  OK
mysql.innodb_index_stats
error    : Table rebuild required. Please do "ALTER TABLE `innodb_index_stats` FORCE" or dump/reload to fix it!
mysql.innodb_table_stats
error    : Table rebuild required. Please do "ALTER TABLE `innodb_table_stats` FORCE" or dump/reload to fix it!
mysql.plugin                                       Needs upgrade

..

`nextcloud`.`oc_twofactor_totp_secrets`            FIXED
`nextcloud`.`oc_users`                             FIXED
`nextcloud`.`oc_vcategory`                         FIXED
`nextcloud`.`oc_vcategory_to_object`               FIXED
`nextcloud`.`oc_whats_new`                         FIXED
Phase 7/7: Running 'FLUSH PRIVILEGES'
OK
If the database is already up to date, the command would not attempt an upgrade without "force":
root@71fb96934128:/# mysql_upgrade -u root -p
Enter password:
This installation of MariaDB is already upgraded to 10.5.17-MariaDB.
There is no need to run mysql_upgrade again for 10.5.17-MariaDB.
You can use --force if you still want to run mysql_upgrade
Tuning - Settings - Optimizations
CronJob

on the host OS
sudo crontab -e*/5 * * * docker exec --user www-data nextcloud_fpm php -f /var/www/html/cron.php > /dev/null 2>&1Security and setup warnings

docker exec --user www-data nextcloud_fpm php occ maintenance:mode --on
docker exec --user www-data nextcloud_fpm php occ db:convert-filecache-bigint
docker exec --user www-data nextcloud_fpm php occ maintenance:mode --off
docker exec --user www-data nextcloud_fpm php occ db:add-missing-indices
Brute Force Protection and Reverse Proxy:
In logging:

/config/config.php:
add from:
'trusted_proxies' => array('172.18.0.2'),
 'forwarded_for_headers' => array('HTTP_X_FORWARDED_FOR')
Connections:
root@soxn:/nextcloud# nano nginx.conf
events { worker_connections 768; }changed to 2048;
NGINX Bad Gateway - OnlyOffice
Initially, I needed the following workaround to start OnlyOffice, but it has since become obsolete ...
Bash script:
#!/bin/bash

url="https://document.DOMAIN"
keyword="Bad Gateway"

if curl -s "$url" | grep "$keyword"
then
    # if the keyword is in the conent
    echo " ERROR"
	docker restart onlyoffice
else
    echo "the website is working fine"
fi
sudo crontab -e
*/10 * * * * . /nextcloud/check.sh > /dev/null 2>&1Preview Images
To make the display in the image gallery work faster, the preview images can be generated in advance using the "Preview Generator" plugin.

After installing the app, the preview images can be generated using the following command:
docker exec --user www-data nextcloud_fpm php occ preview:generate-all -vvvTo ensure that new preview images are generated regularly, I added a cron job on the host system:
sudo crontab -e15 3 * * * docker exec --user www-data nextcloud_fpm php occ preview:pre-generate > /dev/null 2>&1see also: Linux CronJobs - scheduled tasks | Debian crontab [explained]
client_max_body_size
siehe nginx-LetsEncrypt Reverse Proxy in der Praxis
Redis
config/apcu.config.php
<?php
$CONFIG = array (
 'memcache.local' => '\OC\Memcache\APCu',
 'redis' => array(
 'host' => 'nextcloud_redis',
 'port' => 6379,
 ),
 'memcache.locking' => '\OC\Memcache\Redis',
);
Docker .env
If a .env file is created in the folder where the docker-compose.yml file is located, it can be used to modify Docker parameters:
#.env
COMPOSE_HTTP_TIMEOUT=200
Troubleshooting
Internal Server Error
After a power failure I had the following problem:
Internal Server Error

The server encountered an internal error and was unable to complete your request.
Please contact the server administrator if this error reappears multiple times, please include the technical details below in your report.
More details can be found in the server log.
The Redis container kept restarting. In the log I could find the following entry:
Bad file format reading the append only file: make a backup of your AOF file, then use ./redis-check-aof --fix After I deleted the redis folder ./nextcloud/redis the installation could be started again.
WARNING:[pool www] server reached pm.max_children setting (5), consider raising it
With the default settings, the following warning was displayed in the log of the nextcloud:fpm container:
WARNING: [pool www] server reached pm.max_children setting (5), consider raising it The limit can be raised in the FPM config file www.conf, which is hidden in the nextcloud:fpm container:
To view the file, we can connect to the container:
docker exec --user www-data -it nextcloud_fpm bashTo make the changes to the config file available after a reboot, the file can be placed outside the container, but to do this the file must exist:
Use cat /usr/local/etc/php-fpm.d/www.conf to display the contents of www.conf and create www.conf in the root folder:
Add the following line to nextcloup_fpm:
- ./www.conf:/usr/local/etc/php-fpm.d/www.conf #added 4 max-childs-configwith nano.conf the www.conf can be adjusted:
After I have 8GB Ram in my NAS I adjusted the following values:
pm.max_children = 80 #(vorher 5)
pm.start_servers = 2
pm.min_spare_servers = 2 #(voher 1)
pm.max_spare_servers = 15 #(vorher 3)
The complete file looks like this for me:
www.conf
[www]
user = www-data
group = www-data
listen = 127.0.0.1:9000
pm = dynamic
pm.max_children = 80
pm.start_servers = 2
pm.min_spare_servers = 2
pm.max_spare_servers = 15
Exception: Database error when running migration latest for app core
An exception occurred while executing a query: SQLSTATE[HY000]: General error: 4047 InnoDB refuses to write tables with ROW_FORMAT=COMPRESSED or KEY_BLOCK_SIZE.The problem is due to the MariaDB version. From version 10.6 on compressed columns are not supported anymore.
I have solved the problem for now by using version 10.5 of MariaDB:
docker-compose.yml
...
  db:
    image: mariadb:10.5
    container_name: nextcloud_db
...
see: help.nextcloud.com/t/update-to-22-failed-with-database-error-updated/120682
Docker as user / without root privileges
sudo groupadd docker
sudo gpasswd -a $USER docker
Router OpenWrt- internal IP
Since my NAS and thus the NextCloud installation at home is directly accessible via WLAN, without detour: WLAN - router - Internet - router, it makes sense of course to call the installation directly, for this an additional DNS entry at the router is sufficient: Split-DNS. The NextCloud domain is thus resolved in the WLAN with an internal IP.
Here is an example of how to configure my OpenWrt-based router:
vi /etc/config/dhcp
config 'domain'
option name 'next.domain.xx'
option ip 192.168.1.5

config 'domain'
option name 'office.domain.xx'
option ip 192.168.1.5

config 'domain'
option name 'document.domain.xx'
option ip 192.168.1.5
Desktop client
For synchronizing files there is a desktop client for Windows, macOS and Linux. The client integrates seamlessly with the file manager and takes care of synchronizing the folders.
FolderSync Rasperry PI
Install:
sudo apt install owncloud-client-cmdand add it to crontab
crontab -e
* * * owncloudcmd /localfolder https://user:password@nextcloudURL/remote.php/webdav/Ordner >/dev/null 2>&1Conclusion
NextCloud adds countless features to my NAS and gives me the ability to bring cloud services back home:
With NextCloud I now have sync clients for Android, Windows and Linux, can create office documents, charts, or polls in the browser. Besides the photos from the SmartPhone, I can also synchronize or share my contacts and calendar entries and could even run my own messenger incl. call and video function and much more ...
 ({{pro_count}})
{{percentage}} % positive
 ({{con_count}})