Block Internet advertising across the network - Pi-hole/Docker

By using an adblocker, it is possible to hide a large part of the advertisements displayed on the Internet. If you are looking for a central adblocker for your home network, you should take a look at the adblocker Pi-hole. Pi-hole is an open source DNS server with integrated tracking and ad blocker. Pi-hole runs on popular Linux systems and can thus be run on a Raspberry Pi or in a Docker container, among other things. Docker Basics
A container is an isolated environment independent of the operating system (OS):
When a container is first launched, Docker independently loads all the necessary sources
from the internet.
Docker can be installed on Windows, macOS or an Linux Distribution
To ensure that the DNS queries of all devices in the network are answered by Pi-hole, the IP address of Pi-hole can be stored centrally on the router as a DNS server. Devices with automatic address assignment: DHCP, thereby use Pi-hole as DNS and thus its advertising filter. As an example, in the free router firmware OpenWRT, the DNS can be adjusted as follows: OpenWRT - my setup. I use Pi-hole as Docker container on my NAS, see also: Build NAS yourself: flexible, power saving and cheap [HowTo].
docker-compose.yml
Since port 80 on my NAS is already occupied elsewhere, I use a slightly customized version of the manufacturer's docker-compose.yml:
version: "3"

# More info at https://github.com/pi-hole/docker-pi-hole/ and https://docs.pi-hole.net/
services:
  pihole:
    container_name: pihole
    image: pihole/pihole:latest
    ports:
      - "53:53/tcp"
      - "53:53/udp"
      - "67:67/udp"
      - "84:80/tcp"
    environment:
      TZ: 'Europe/Amsterdam'
      WEBPASSWORD: 'password'
    # Volumes store your data between container upgrades
    volumes:
      - './etc-pihole/:/etc/pihole/'
      - './etc-dnsmasq.d/:/etc/dnsmasq.d/'
    # Recommended but not required (DHCP needs NET_ADMIN)
    #   https://github.com/pi-hole/docker-pi-hole#note-on-capabilities
    cap_add:
      - NET_ADMIN
    restart: always
In the file, port 84 is mapped to 80. Accordingly, the admin interface is later accessible under the IP address of the NAS with port 84. In addition, I have filled the variable "WEBPASSWORD" with a secure password. The example uses bind mounts and not docker volumes to permanently store data. See: Docker data storage: Docker Volumes vs. Host Folders
The container is started in the terminal with the following command:
docker compose upAt the first start I had a problem with port 53, it was already occupied on my NAS:
Ubuntu/Debian port 53 occupied.
Since my NAS uses Debian, the systemd-resolv service blocks DNS port 53. So that port 53 can be used for the Pi-hole Docker container, I disabled the systemd-resolv service.
user@rechner:/docker/pi-hole$ sudo netstat -tulpn | grep LISTEN
...
tcp        0      0 127.0.0.53:53           0.0.0.0:*               LISTEN      1279/systemd-resolv
...
user@rechner:/docker/pi-hole$ sudo systemctl disable systemd-resolved.service
Removed /etc/systemd/system/dbus-org.freedesktop.resolve1.service.
Removed /etc/systemd/system/multi-user.target.wants/systemd-resolved.service.
user@rechner:/docker/pi-hole$ sudo systemctl stop systemd-resolvedAdmin interface
The admin interface is called in the browser with the IP address of the NAS and the previously used port 84:
http://x.x.x.x:84/admin
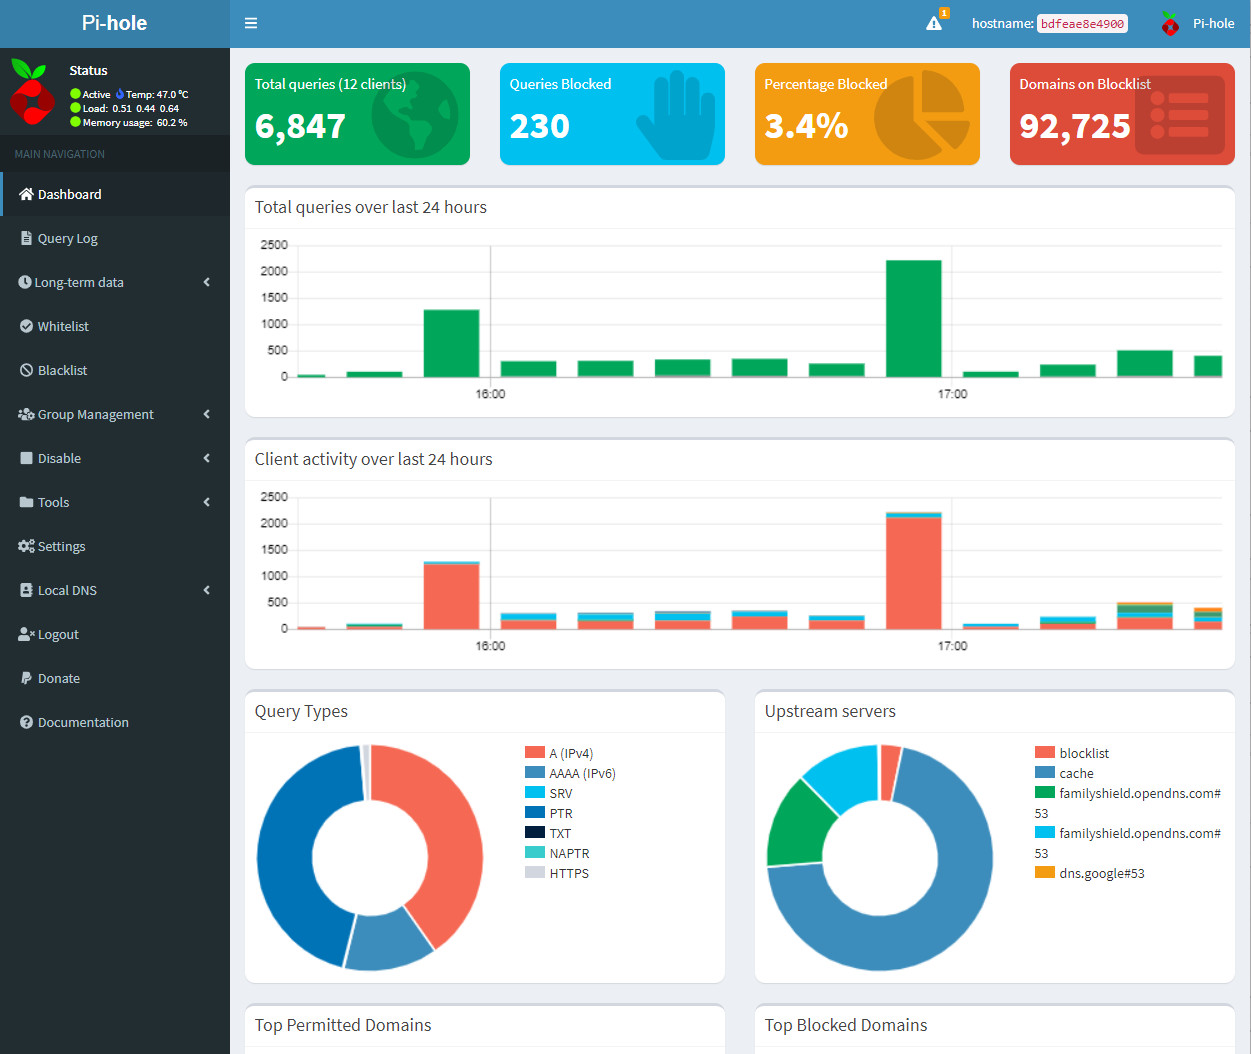
Pi-hole uses a predefined blacklist and shows statistics about the clients and the allowed, as well as blocked domains already on the start page:

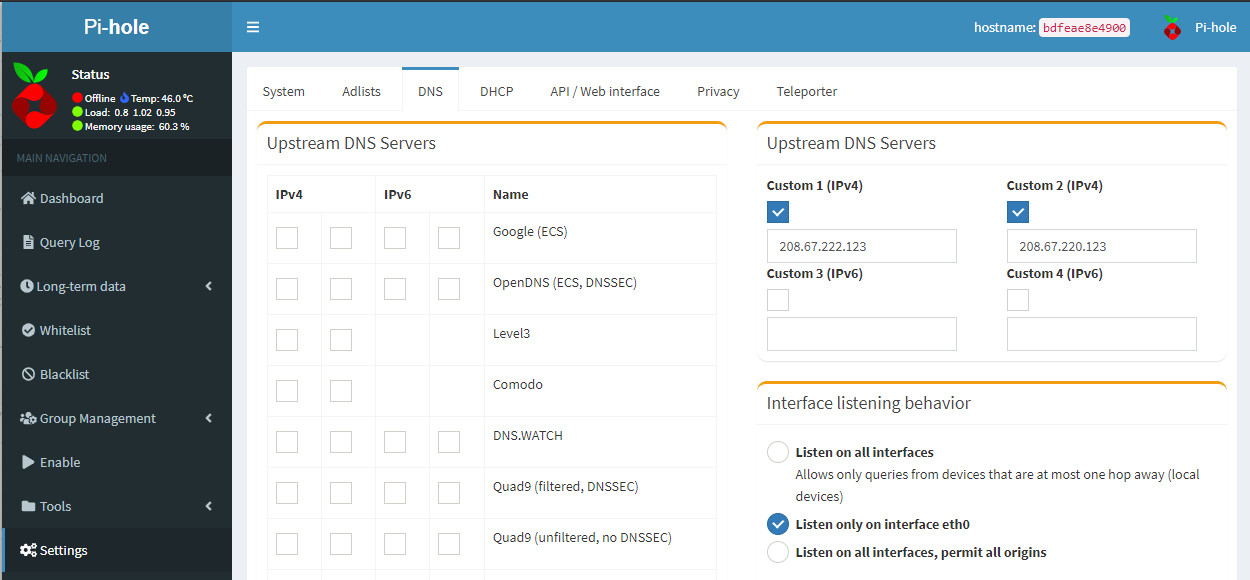
In addition to Pi-hole, I currently use the DNS servers of OpenDNS as upstream DNS servers to banish adult content from the home network as far as possible. See: child-safe Internet via the home network - DNS on the router
In Pi-hole, the setting for the upstream DNS server is located under Settings/DNS:
 ({{pro_count}})
{{percentage}} % positive
 ({{con_count}})