Nginx-LetsEncrypt reverse proxy in practice

In addition to Traefk, the Nginx Proxy Automation project can be used to run multiple web services with corresponding SSL certificates on one server . The setup involves several Docker containers that together provide an Nginx reverse proxy including certificate management and SSL offloading. Once the containers are started via Docker Compose, they take care of serving multiple websites over a common IP and its certificate management: for issuing certificates for new containers and renewing them for existing containers: all on the fly and within a few seconds. As an alternative to NGINX Proxy Automation, the better-known reverse proxy Traefik can also be used.
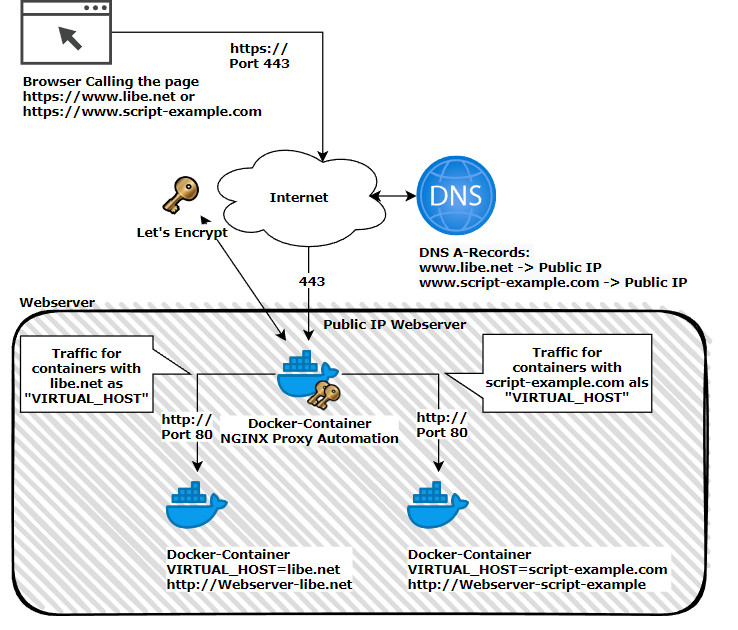
Schematic representation
Shown here schematically, based on the pages www.libe.net and www.script-example.com:

NGINX Proxy Automation listens on port 80 and 443 after starting the containers. The two ports must be available on the Internet under a public IP:
A virtual or cloud server of a shared hoster can be used as a web server, or the own PC at home with a configured port forwarding at the router.
This means that anyone who owns a domain can, for example, have an A record of the domain or a subdomain point to the public IP of the server or PC. Alternatively, services such as DynDNS can also be used for this purpose. See: Free DynDNS service - access with changing public IP. In case of a PC located at home, the public IP of the provider can be used for the DNS entry - if the provider allows it - and a port-forwarding of port 443 to the IP of the PC can be created at the router, see: port-forwarding.
Installation - Nginx Let's Encrypt Proxy
Docker Basics
A container is an isolated environment independent of the operating system (OS):
When a container is first launched, Docker independently loads all the necessary sources
from the internet.
Docker can be installed on Windows, macOS or an Linux Distribution
For a quick start, the following repo can be cloned: github.com/evertramos/nginx-proxy-automation. The current version of the project is:
Software Nginx-proxy-automation GitHub https://github.com/evertramos/nginx-proxy-automation current version 2.0
found 2025-04-20
Specifically, the following commands are needed for the startup:
sudo apt-get update
sudo apt-get upgrade
sudo apt-get install git
cd /var
mkdir docker
git clone --recurse-submodules https://github.com/evertramos/nginx-proxy-automation.git webproxy
cd webproxy/bin && ./fresh-start.sh --yes -e your_email@domain --skip-docker-image-check
As network for the proxy I specified “webproxy” in the wizard.
After the start, any number of websites can be started additionally. The nginx proxy automatically adjusts its configuration based on the properties of the containers. So that the web servers for its domains also get a certificate, and/or are attainable from the Internet, it is sufficient to deposit the following values as properties for the containers:
- -e VIRTUAL_HOST=???.domain.tld
- -e LETSENCRYPT_HOST=???.domain.tld
- -e LETSENCRYPT_EMAIL=admin@domain.tld
- --network=webproxy
The variable “VIRTUAL_HOST” specifies to which container the reverse proxy should pass traffic for this domain. “LETSENCRYPT_HOST” is the DNS name for the Lets Encrypt certificate (should be equal to “VIRTUAL_HOST”) and “LETSENCRYPT_EMAIL” is the mail address that will be used when issuing the certificate. The network “webproxy” was used as the backend network name in the Docker compose config downloaded earlier. After making the domains known in the nginx proxy, the requests to the container will be routed through the webproxy network of the reverse proxy.
Example: launching a web page
Before we launch the first web page, an A-record must be placed in the DNS pointing to the public IP address of the web server. After that, a simple web server can be made available on the Internet with the following commands, including SSL certificate:
docker run -d -e VIRTUAL_HOST=???.domain.tld \
              -e LETSENCRYPT_HOST=???.domain.tld \
              -e LETSENCRYPT_EMAIL=admin@domain.tld \
              --network=webproxy \
              --name ??? \
              -v /var/www/???/httpdocs:/var/www \
              httpd:alpine
What exactly does NGINX Proxy Automation do?
NGINX Proxy Automation uses the properties of other containers and enters them as upstream servers. It acts as a reverse proxy and forwards all requests. For forwarding, port 80 can be used, for accessing the hosted pages 80 or 443. For https, port 443 the SSL certificate is managed and extended by the reverse proxy: SSL offloading.
Issue and renew certificate
Certificate management runs automatically with this setup. A look at the logs reveals what happens in the background: The container nginx-letsencrypt checks the certificates at startup and every 60 minutes. If a new certificate is needed, it is requested and used:
nginx-letsencrypt    | /etc/nginx/certs/www.libe.net /app
nginx-letsencrypt    | Creating/renewal www.libe.net certificates... (www.libe.net)
nginx-letsencrypt    | 2021-03-14 11:09:24,871:INFO:simp_le:1414: Generating new certificate private key
nginx-web            | www.libe.net 18.196.96.172 - - [14/Mar/2021:11:09:26 +0000] "GET /.well-known/acme-challenge/??? HTTP/1.1" 200 87 "-" "Mozilla/5.0 (compatible; Let's Encrypt validation server; +https://www.letsencrypt.org)"
nginx-web            | www.libe.net 3.128.26.105 - - [14/Mar/2021:11:09:26 +0000] "GET /.well-known/acme-challenge/??? HTTP/1.1" 200 87 "-" "Mozilla/5.0 (compatible; Let's Encrypt validation server; +https://www.letsencrypt.org)"
nginx-web            | www.libe.net 34.211.6.84 - - [14/Mar/2021:11:09:26 +0000] "GET /.well-known/acme-challenge/??? HTTP/1.1" 200 87 "-" "Mozilla/5.0 (compatible; Let's Encrypt validation server; +https://www.letsencrypt.org)"
nginx-web            | www.libe.net 66.133.109.36 - - [14/Mar/2021:11:09:26 +0000] "GET /.well-known/acme-challenge/??? HTTP/1.1" 200 87 "-" "Mozilla/5.0 (compatible; Let's Encrypt validation server; +https://www.letsencrypt.org)"
nginx-letsencrypt    | 2021-03-14 11:09:29,190:INFO:simp_le:396: Saving key.pem
nginx-letsencrypt    | 2021-03-14 11:09:29,191:INFO:simp_le:396: Saving chain.pem
nginx-letsencrypt    | 2021-03-14 11:09:29,193:INFO:simp_le:396: Saving fullchain.pem
nginx-letsencrypt    | 2021-03-14 11:09:29,193:INFO:simp_le:396: Saving cert.pem
Rate-Limit: here were too many requests of a given type :: Error creating new order
If, for example, the DNS does not yet point to the public IP address and the container is already running, some patience is required. I had not so much patience at this point and restarted NGINX Proxy Automation several times, whereupon it asked for a certificate at each startup, which could not be issued due to the DNS entry. At this point I learned that only 5 requests for a new certificate are allowed per hour, reflected in the logs as follows:
Attaching to nginx-letsencrypt, nginx-gen, nginx-web
...
nginx-gen            | 2021/03/14 10:09:12 Generated '/etc/nginx/conf.d/default.conf' from 12 containers
...
nginx-gen            | 2021/03/14 10:09:12 Contents of /etc/nginx/conf.d/default.conf did not change. Skipping notification ''
...
nginx-letsencrypt    | Creating/renewal www.script-example.com certificates... (www.script-example.com)
nginx-letsencrypt    | 2021-03-14 10:09:19,372:INFO:simp_le:1546: Certificates already exist and renewal is not necessary, exiting with status code 1.
...
nginx-letsencrypt    | Creating/renewal www.libe.net certificates... (www.libe.net)
nginx-letsencrypt    | 2021-03-14 10:09:17,961:INFO:simp_le:1414: Generating new certificate private key
nginx-letsencrypt    | ACME server returned an error: urn:ietf:params:acme:error:rateLimited :: There were too many requests of a given type :: Error creating new order :: too many failed authorizations recently: see https://letsencrypt.org/docs/rate-limits/
...
nginx-letsencrypt    | Sleep for 3600s
The solution: wait one hour. The Letsencrypt-nginx-proxy-companion tries again in the next hour and if the DNS then fits, a certificate is also issued and used.
multiple subdomains (SAN)
Let's Encrypt certificates can be issued to multiple subdomains, a simple common example would be the root domain and the subdomain with a www prefix: https://libe.net and https://www.libe.net. As an example, the following Docker call can be used to request certificates for both URLs:
docker run -d -e VIRTUAL_HOST=www.libe.net,libe.net \
              -e LETSENCRYPT_HOST=www.libe.net,libe.net \
              -e LETSENCRYPT_EMAIL=admin@domain.tld \
              --network=webproxy \
              --name ??? \
              -v /var/www/???/httpdocs:/var/www \
              httpd:alpine
As a prerequisite, of course, all DNS records of the subdomains must exist and point to the server.
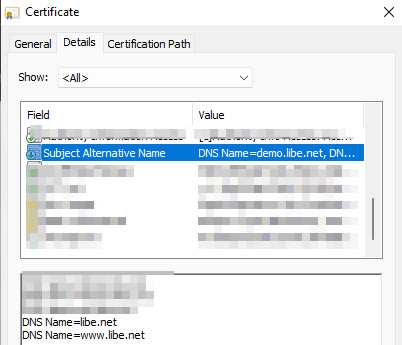
In the properties of the certificate, additional subdomains are reflectedas “Alternative Applicant Name” (SAN: Subject Alternative Name):

With this setup, the website should be accessible on all domains, but usually the website should primarily use one URL: e.g. “www.libe.net”. The call via “libe.net” should then be redirected to “www.libe.net”:
Redirect URLs: Non-www to www
If you have specified multiple subdomains when starting the container (SAN), you can create a 301 redirect to another subdomain for certain subdomains.
So that now the domain.tld is redirected to www.domain.tld, a file with the exact name of the domain (domain.tld) can be created under /data/vhost.d and within the file the redirection can be placed:
if ($request_uri !~ "^/.well-known/acme-challenge")
{
  return 301 https://www.domain.tld$request_uri;
}
Reload nginx
The following command can be used to reload the nginx configuration:
docker exec -it proxy-web-auto nginx -s reloadLogs
Details about issuing and renewing the certificates can be viewed via the following log:
docker logs -f letsencrypt-autoUpdate from version 0.4
I have been using NGINX Proxy Automation since version 0.4, see github.com/evertramos/nginx-proxy-automation/tree/v0.4. Since the scripts have changed quite a bit with version 0.5, the update must be done according to the instructions, for example to version 0.6: github.com/evertramos/nginx-proxy-automation/blob/master/docs/upgrade-guide.md. Some patience is required for the update, as the certificates are recreated in the process, which can take a minute or two depending on the number of web services.
413 Request Entity too Large
If you did not select the option “Use NGINX Conf Files” during setup, you can do so as follows:
For this purpose, the following line must be added to the “.env” file processing the Conf files:
USE_NGINX_CONF_FILES=trueAfterwards, additional configuration files can be stored in the data/conf.d/ folder, for example adjusting the “client_max_body_size” to increase the upload sizes and thus avoid the error 413 Request Entity too Large:
Datei: /data/conf.d/uploadsize.conf
client_max_body_size 100m;
Web services
The described solution can then be used to run other web services:
Even though I have now switched the listed websites to the Traefik reverse proxy , they could also be run with the Let's Encrypt-nginx-proxy-companion from Evert Ramos presented here . Instead of environment variables , this requires usinglabels in the Docker Compose configuration.
For those who want to use this reverse proxy instead of Traefik, the easiest way is to replace the environment variables with labels.
Here is a comparison of the docker-compose.yml settings of both proxies: NGINX Proxy Automation vs. Traefik; Environment vs. Labels:
| NGINX Proxy Automation | Traefik-Reverse-Proxy |
|---|---|
|
|
 ({{pro_count}})
{{percentage}} % positive
 ({{con_count}})