Deye PV balcony power plant commissioning and HA integration

The hype about PV systems has also left its mark on me, so - in order to gain some experience - I have put together an 800 watt balcony power plant: Cost in total about 600$. Balcony power plants are often offered as a set, which usually consists of an inverter and two PV modules including cables. The power of the inverter limits the maximum generation power of the plant. In Austria, balcony power plants with a generation capacity of up to a maximum of 800 watts are currently allowed, Germany should soon increase the limit of 600 watts to 800 watts. Somewhat dazzled by the fact that the Deye Sun800G3-eu-230 should be able to Zigbee, I decided to buy this inverter.
The heart: The inverter
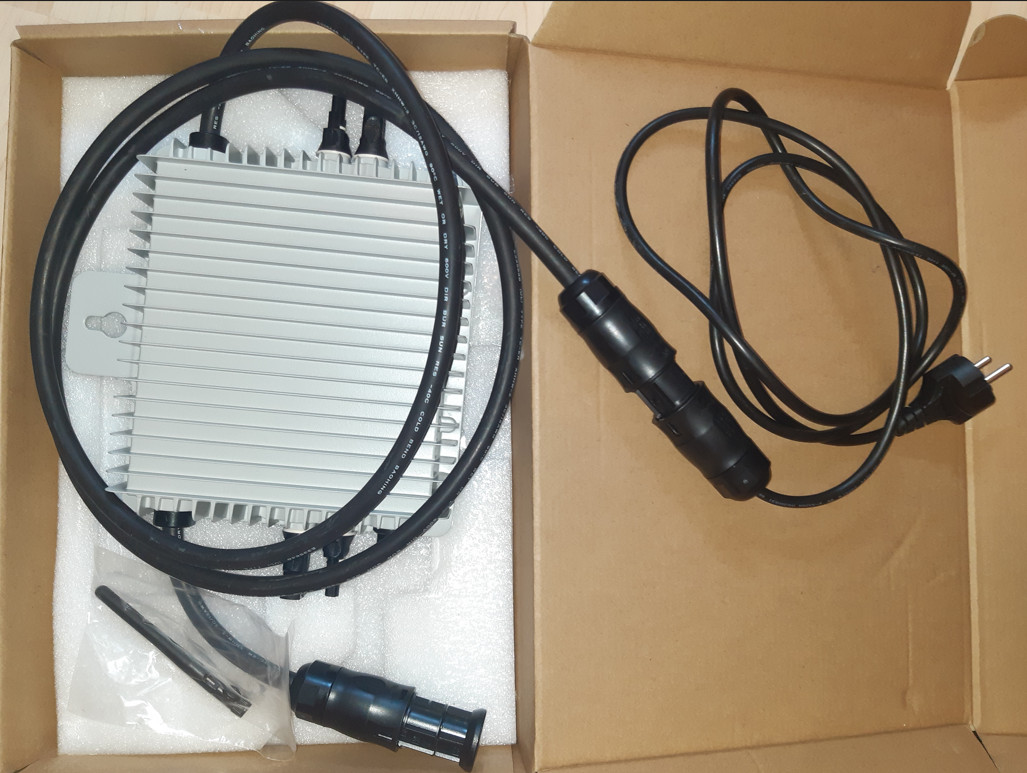
To make the most of the 800 watts of power, I chose the Deye Sun800G3-eu-230 model. The scope of delivery of the Deye microinverter includes the following components in addition to the actual inverter:
- Betteri BC01 female connector (female) and end cap (male),
- WLAN antenna,
- Installation manual
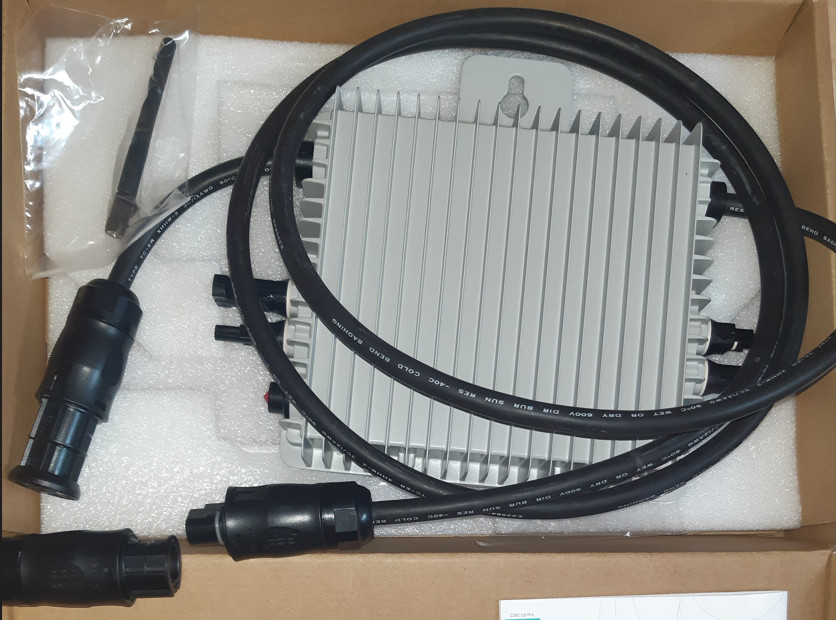
Two cables lead into the inverter. One cable is used to connect the inverter to the mains via the BC01 connector, the second cable could be used to connect another inverter. When using only one inverter, the supplied end cap goes on the second cable.
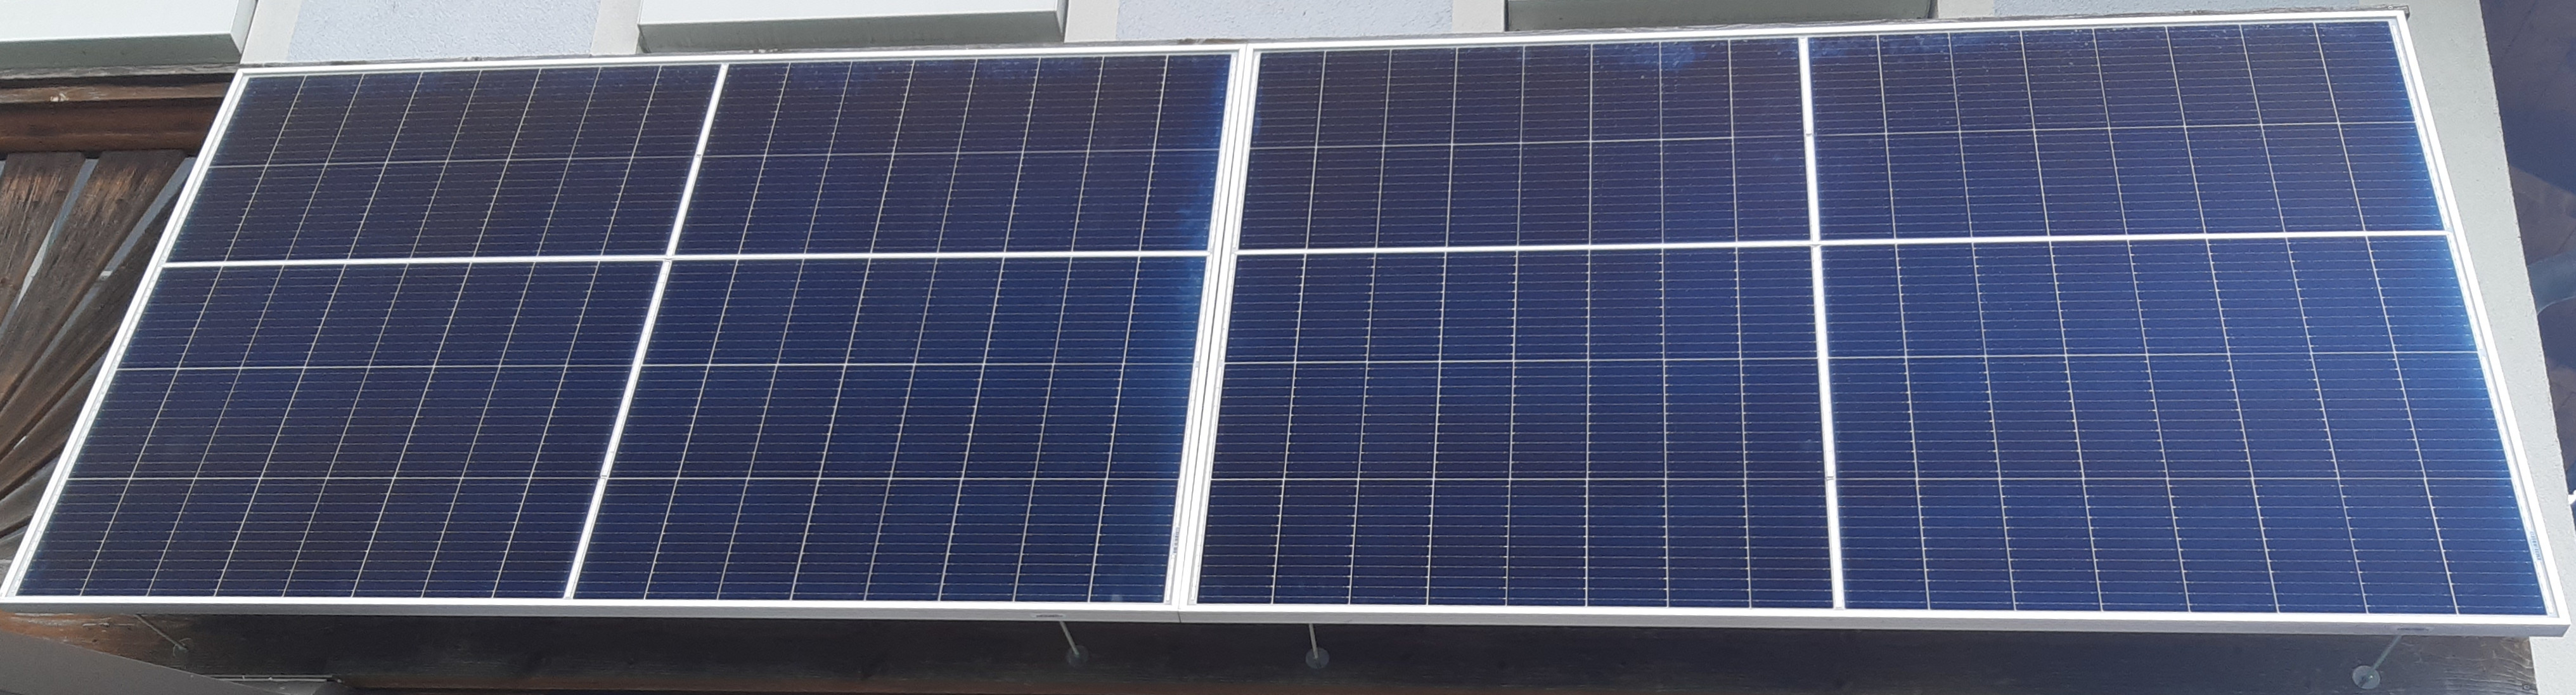
The most important thing, the PV panels:
Since the shipping of PV panels is not without problems and at least due to the dimensions a bit expensive, I looked for a local supplier and first got 2 pieces of 410W peak PV panels:
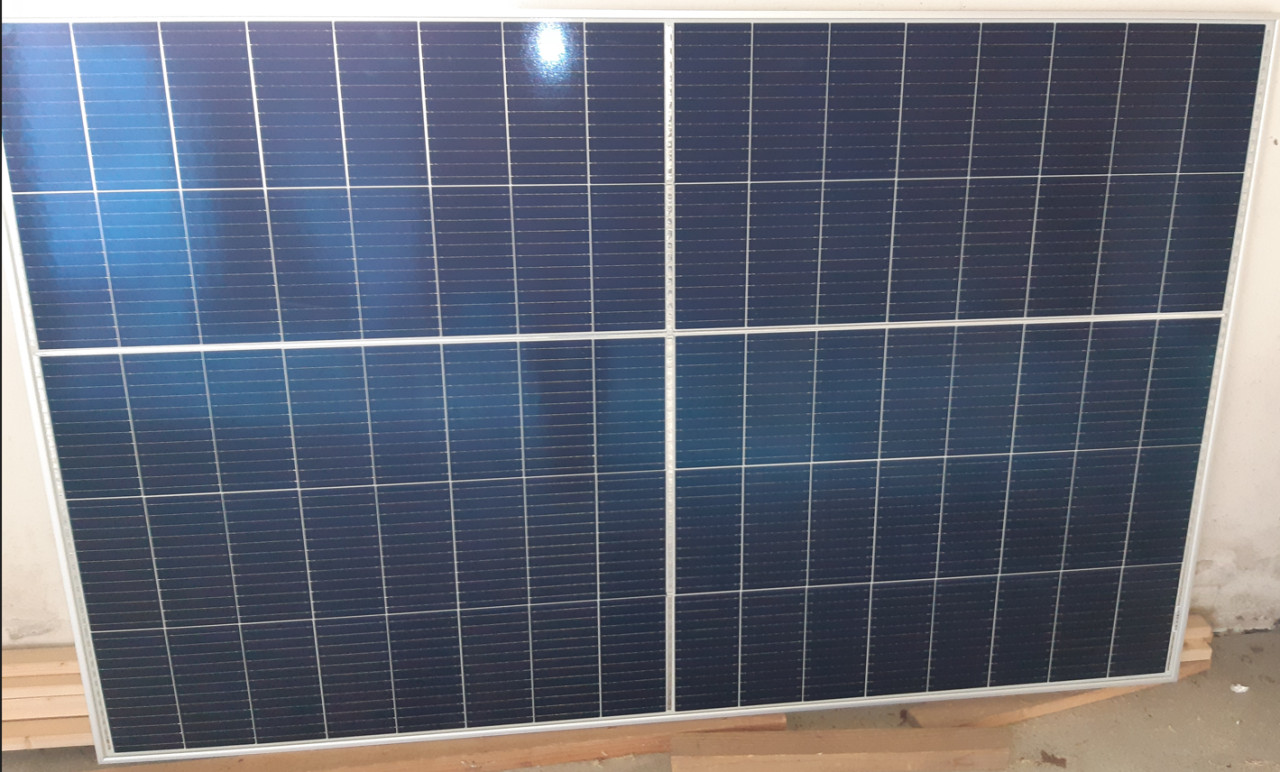
The GSM12/80 panels are somewhat special, as they have a maximum power current (Imp) of 16.51 A at a very low voltage (Vmp) of 24.8V. At the time of purchase, I looked at this data, but only later realized that the inverter cannot process more than 13A and therefore cannot technically achieve the 800 watts with 2 panels. However, the low voltage makes it possible to connect 2 panels in series to one input. As the panels have a Voc value of 29.8V, I was initially concerned that the inverter would reach its limit at low temperatures, but this did not prove to be the case in practice, see: PV modules in winter: Calculating voltage vs. current.
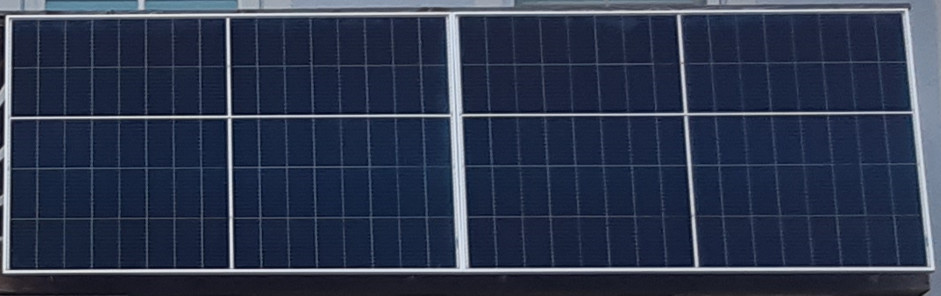
With 4 panels, the system delivers the 800 watts when the sun shines for several hours and correspondingly more in poorer conditions. Other inverters are certainly better suited for use with 4 PV modules, as the Sun800G3 exceeds either the voltage or current limits with most module types. As an example, the HMS-2000-4T is much better suited for use with 4 modules. Balcony power plant: Hoymiles HMS, best inverter?
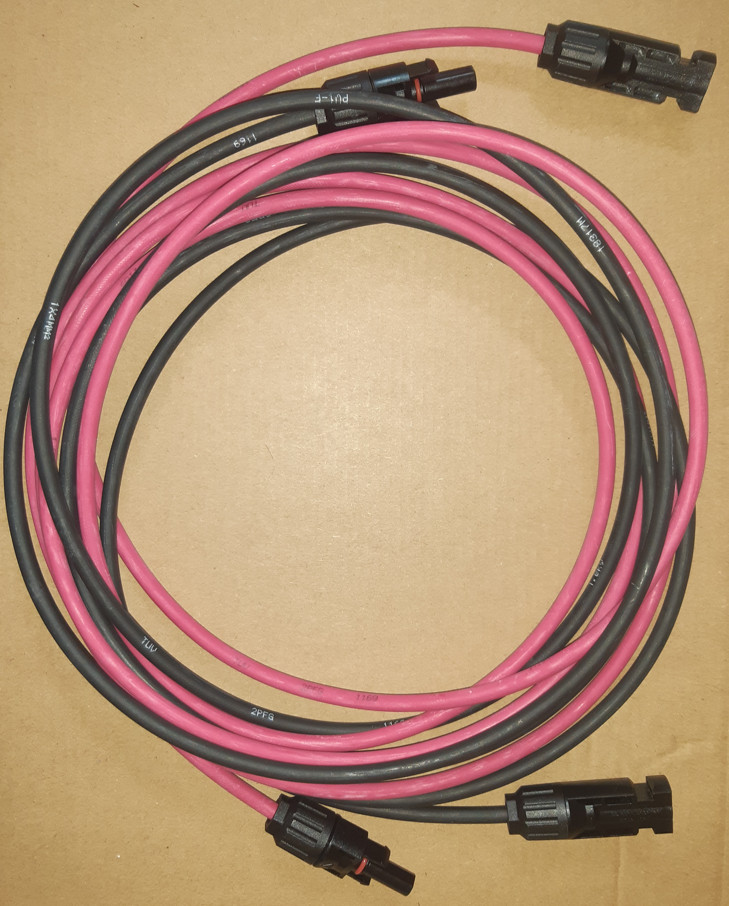
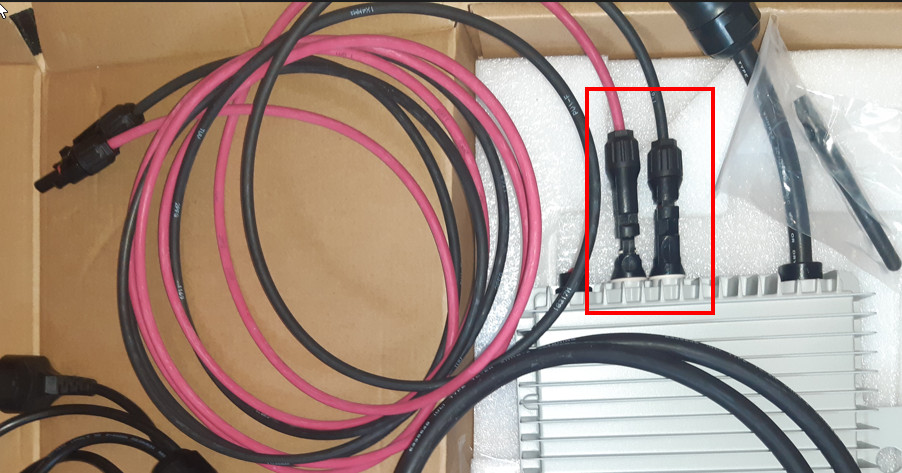
Accessories: MC4 cable
The panels areconnected to the inverter via MC4 cables, which means another item on the shopping list: 3 x 2 pieces of MC4 cables.
 |
|
Installation
To connect to the mains, I first connected the supplied BC1 socket to an old Schuko cable from my rummage box. If you use a flexible cable, you should not forget the ferrules. Alternatively, an appropriate ready-made connection cable can of course be used.
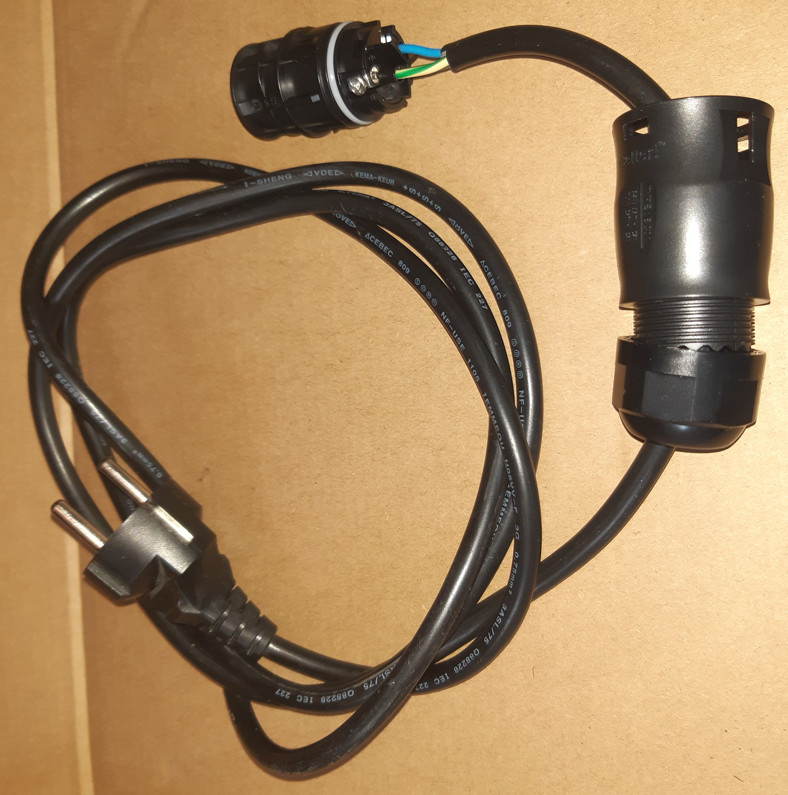
From an electrotechnical point of view, the cable is very interesting, because there is voltage on the pins of the Schuko plug, unlike originally intended, when the small power plant is in operation. In order for this not to become dangerous, the inverter must deactivate in a flash when unplugged: At least I hope so, but still try to avoid touching it.
Wiring from the inverter to the panels is very simple with the MC4 cables mentioned earlier:
I used M6 threaded rods and nuts to attach them to the wooden balcony:

Everything plugged together and purely connected to the power grid, the inverter does not report yet; this starts only when the connected PV modules provide enough power: At this point, it's a matter of waiting for the sun to shine.
Commissioning
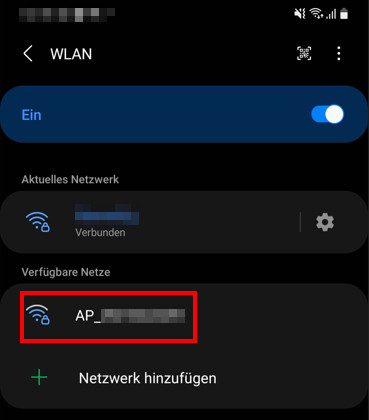
Important: The WLAN antenna included in the delivery makes sense, because without it, the reception is not sufficient for the connection to the router. If the sun is shining bright enough, the inverter reports as AccessPoint with AP_ and its serial number:
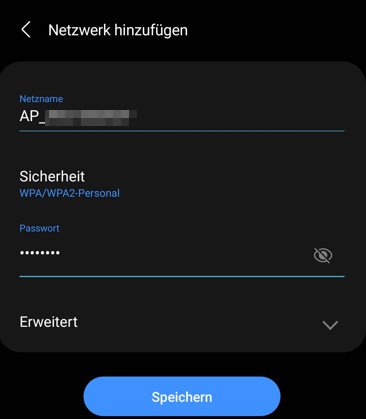
The default password for the integrated hotspot is "12345678". The web interface can then be accessed via the address 10.10.100.254 and the user name "admin" and the password of the same name "admin".
In order for the inverter to connect directly to the WLAN, the WLAN access data can be stored in the "Quick Set" menu:
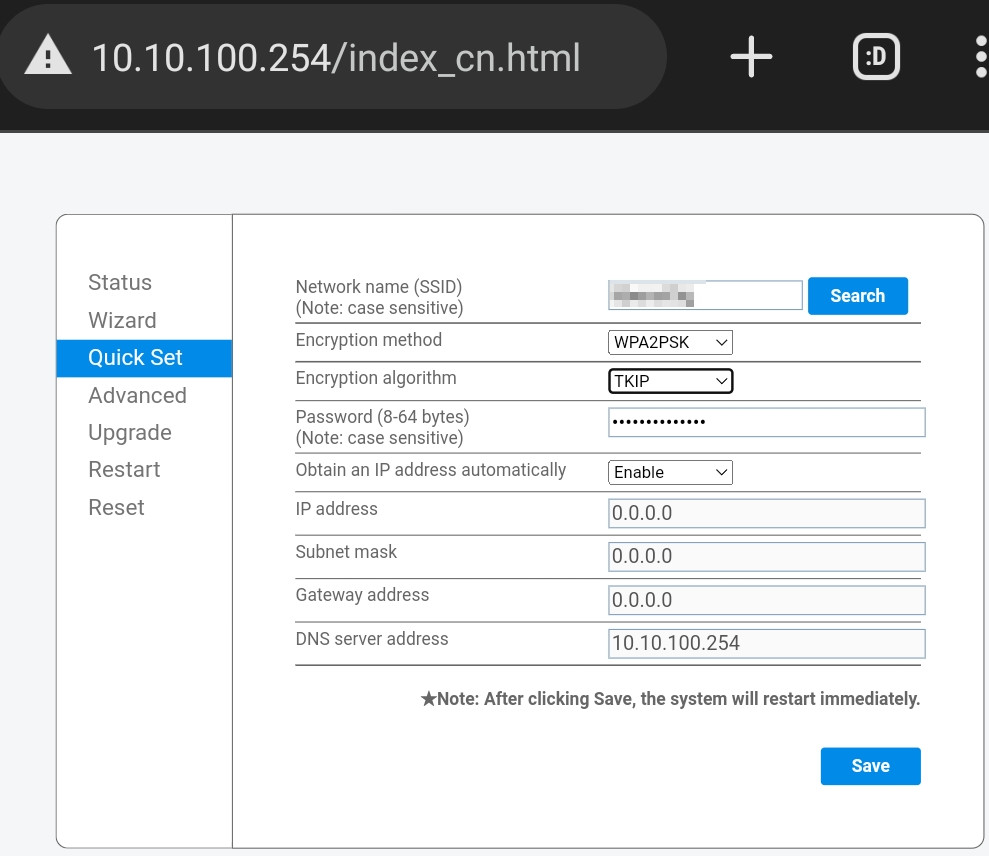
If the inverter is connected to the own WLAN, it gets an IP address from the WLAN router. The address can be found out the admin interface of the router or alternatively with the following PowerShell script: Find IP addresses in the network, even if their firewall is activated.
Security
To secure the web interface, the admin password and the AP password should be changed:

The password at this point is limited to 15 digits. It is possible to enter a longer password, even the saving process does not return an error, but for the login you still have to use the first 15 digits of the password. I know this because I thought I was locked out, but the GUI clearly says: "Max. 15 characters".
Deye SUN forgotten password / factory settings
If you have forgotten the password for the SUN600/800G3, you can exploit a security gap and simply read out the access data using a small tool. The tool can be downloaded from the following page: github.com/s10l/deye-logger-at-cmd/releases/tag/v1.0
After the download, the inverter can be read out in the command prompt (cmd.exe) as follows:
First, "AT+WAPMXSTA" can be used to check whether logins are generally permitted:
main.exe -t 192.168.0.??:48899 -xat AT+WAPMXSTA

+ok=5 means that the inverter is ready to allow the connection for up to 5 clients via WLAN.
If the setting differs, it can be set using the following command:
main.exe -t 192.168.1.91:48899 -xat AT+WAPMXSTA=5Read out the current WLAN settings:
main.exe -t 192.168.0.??:48899 -xat AT+WSKEY
Read DHCP settings:
main.exe -t 192.168.0.??:48899 -xat AT+WANN
Now the most important thing, the access data (user name and password) for accessing the web interface:
main.exe -t 192.168.0.??:48899 -xat AT+WEBU
Factory settings
Once the access data has been read out, it should be possible to log in to the web interface again. All inverter settings can be reset via "Reset" and "Restore factory settings":

Deye: What about Zigbee now?
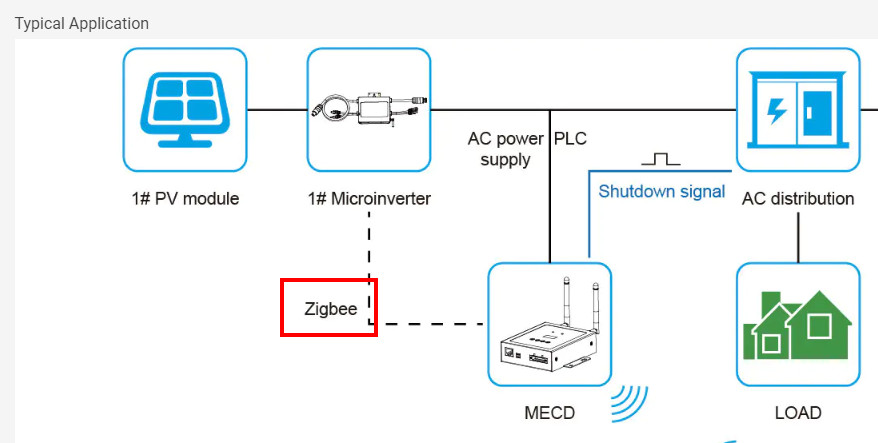
In the installation / user manual it says Zigbee as communication, but unfortunately no details how the inverter could be put into pairing mode:

The datasheet is a bit more specific: Zigbee "or" WIFI:

Source: https://www.deyeinverter.com/deyeinverter/2023/03/09/rand/6987/...SUN-(600-1000)G3...pdf
I could also find a reference to Zigbee in the MECD communications gateway offered by Deye:
Source: https://www.deyeinverter.com/product/accessory-monitoring-1/mwcd.html
At least with ZHA I could not find the inverter even after multiple searches ...
So plan B after all: WIFI, no problem: I just want to integrate the inverter into Home Assistant:
Home Assistant Integration
Solarman Integration
Originally it was not possible for me to query the inverter with the Solarman integration. I suspected the installed firmware: MW3_16U_5406_1.53, or it could be that I tried the "Inverter serial number" and not the "Device serial number" for the connection. After downloading the data from the web interface via cURL in the meantime, I noticed a few days later that the inverter has installed a new firmware version on its own in the meantime: Current version:MW3_16U_5406_1.57. When I tried again to use Solarman and with the "Device serial number" the inverter could be connected quite easily:

First of all, the Solarman integration with the Home Assistant Community Store (HACS) and then add it in Settings / Integration to add it:

Solarman:

The IP address, Device Serial Number and as profile: deye_4mppt.yaml:


Unfortunately, the values are only updated every 5 minutes: I am frugal and take what I get.
Status via cURL:
If Solarman does not work, the status can also be queried using cURL.The status page of the integrated web interface shows the current power and the total power:

Unfortunately, the update of the values is only every 5 minutes: I am frugal and take what I get. After the website is only secured via basic authentication, the status page can be downloaded and parsed via a curl command. A quick test already provides the desired values:
root@test:~# curl http://admin:admin@192.168.1.91/status.html -s | grep -e "var webdata"
...
var webdata_now_p = "380";
var webdata_today_e = "8.40";
var webdata_total_e = "8.9";
...
Specifically, the status can be read directly without an integration, purely with the command_line platform and curl, and the value can be prepared for the energy dashboard using a template:
Home Assistant configuration.yaml
Here is my adaptation of the configuration.yaml file of Home Assistant for reading out the dashboard:
command_line:
  - sensor:
      name: power_balkon_pv_now
      command: curl -s -u admin:admin http://192.168.1.91/status.html | grep -E "\webdata_now_p(\s|$)" | cut -d'"' -f 2
      unit_of_measurement: 'W'
      scan_interval: 60
  - sensor:
      name: power_balkon_pv_total
      command: curl -s -u admin:admin  http://192.168.1.91/status.html | grep -E "\webdata_total_e(\s|$)" | cut -d'"' -f 2
      unit_of_measurement: 'kWh'
      scan_interval: 120
template:
  - sensor:
      name: "balkon_pv_energy"
      state: "{{ states('sensor.power_balkon_pv_total') if states('sensor.power_balkon_pv_total') | float > 0 }}"
      unit_of_measurement: kWh
      device_class: energy
      state_class: total_increasing
      unique_id: balkon_pv_energy
The hopefully previously changed password of the admin user as well as the IP address must of course be adjusted in the command line (curl -s -u admin:password http://IP). See also, HA: Use values of any WebGUI as entities
Universal emergency solution: Measure current via a power socket
Then I had the idea to simply hang a Zigbee socket between the inverter and the power outlet and measure the power via it: Would work, even though I still don't use the plug, since it's not really suitable for outdoor.
Here is a comparison of the values from a one-day test. In green: The values from the inverter, in red the values from the controllable Zigbee socket, mind you on a day in March, so not yet with the maximum possible solar radiation, yet I was able to collect 2.9kWh distributed over the day:
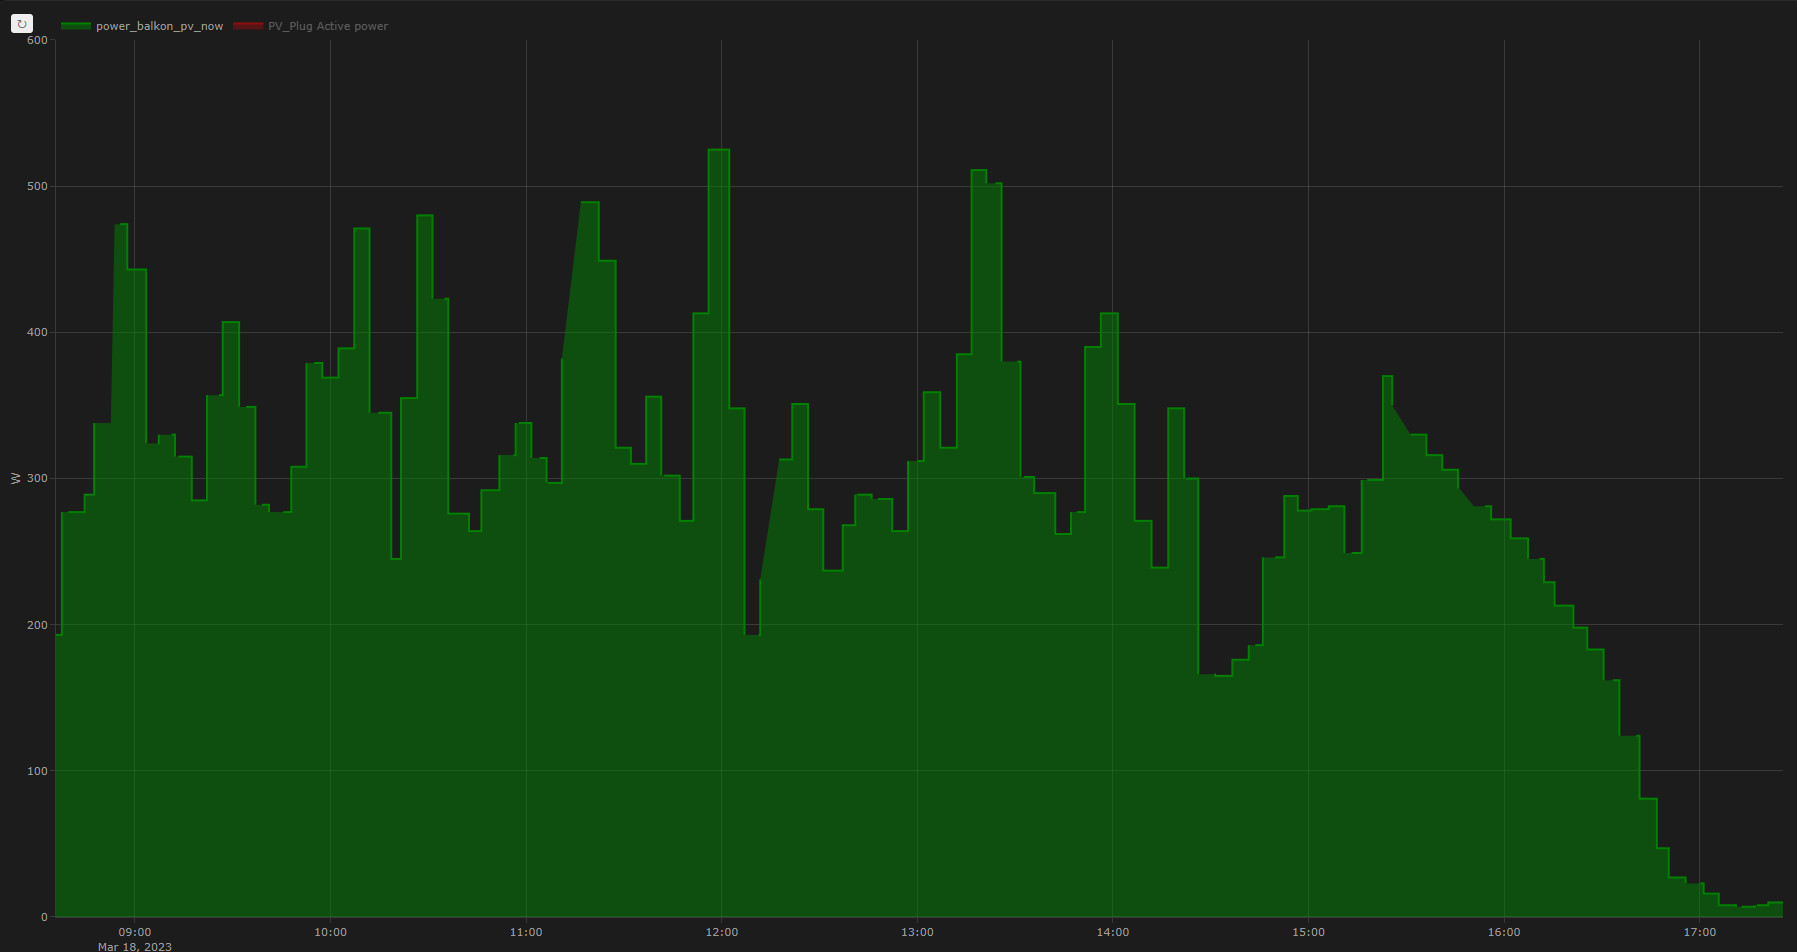
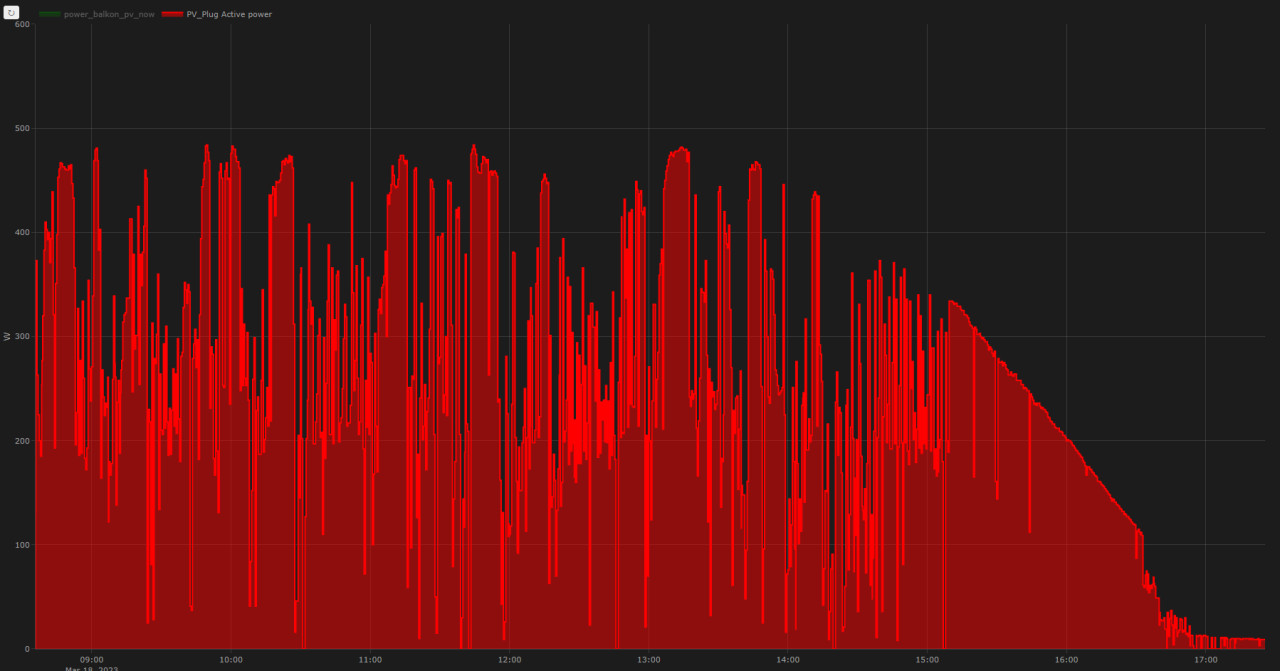
The 5-minute values of the inverter are somewhat inaccurate, but roughly the values agree with the socket.
Deye: Access better without internet, but update before anyway ...
The Deye inverters were in the media several times in 2023 with negative headlines: in the middle of 2023, because a ralais prescribed by the VDE is not installed and beginning of 2023, with the fact that the password of the WLAN access point could not be changed: Thus, the local hotspot could be used by anyone in the vicinity and the device could be managed or deactivated via it. With the current firmware, this gap has been closed, but I still decided not to connect the inverter to the Internet after the update and to do without the Solarman Smart App. One of the reasons why I don't need the app is that I already have the smart meter values in Home Assistant and can use them to create much better evaluations and, if necessary, automations.
I get the data for the energy consumption and the feed-in power directly from the smart meter of the grid operator. See also: Use grid operator’s smart meter KAIFA MA309M
Block Firewall
To prevent internet access I was not able to save the settings in the web interface with an invalid default gateway: These were simply undone after the reboot. The better solution is to block the internet access via the WLAN router anyway, here using the example of a router with OpenWrt firmware:

As a side note, it can be mentioned that the daily counter is worthless without internet connection, as it resets only when the inverter has delivered its data to the China cloud:

Lessens learned
Do I need to pay attention to phases in a balcony power plant?
House connection meters sum the consumption of all phases. If excess power is produced on one of the three phases, it can be consumed on another phase.
Does a microinverter require standby power when it is not active?
Since the Deye SUN800G3-EU-230 only starts up when there is enough power from the solar panels, I would have thought that it would not need standby power: The inverter and its WLAN are not active without PV power, yet the standby power is specified at 50mW (Night Time Power Consumption).
Are two PV panels enough for 800 watts?
Two 410 watt peak panels were not enough to utilize the 800 watt inverter in summer. As the angle on the balcony is not ideal and the inverter only processes 13A, I was rarely able to reach 600 watts with two panels in practice. As my panels supply a relatively low voltage, I am currently testing 2 panels in series on one input. With 4 panels, the balcony power station is somewhat oversized, but it manages the 800 watts with ease and still delivers a decent amount when it's cloudy. Compared to summer, the system reaches 800 watts even faster in winter when the sun is shining: A lot of power is lost here. Contrary to initial fears, the maximum permissible voltage of the inverter does not pose a problem in practice at lower temperatures. Even after the upgrade, the total cost is still less than €1000. If you want to utilize the entire output when using 4 panels, you should choose a different inverter, such as the Hoymiles HMS-2000-4T.See: Balcony power plant: Hoymiles HMS, best inverter?
Conclusion
The Deye inverter does what it is supposed to, yet the device does not really shine on closer inspection. I could not find any indication on the Internet that the repeatedly mentioned Zigbee communication protocol can really be used, nor whether Zigbee is installed at all? At least there are several possibilities to address the inverter via WLAN, even if the updating of the values takes place only every every 5 minutes. All's well that ends well and the home assistant is also satisfied ...
Alternative inverter with 4 inputs and the option to limit the power to 600 or 800 watts, see: Hoymiles HMS, best balcony power station inverter?
More than a balcony power plant?, see: PV - Considerations - Planning - Implementation
 ({{pro_count}})
{{percentage}} % positive
 ({{con_count}})
THANK YOU for your review!
Questions / Comments
(sorted by rating / date) [all comments (best rated first)]
Hi, thanks for the article. Question: can I limit the export to grid to zero somehow?
as far as i know, you can not limit this inverter. Other inverters, such as Hoymiles can: https://www.libe.net/hms
In addition, you would need a smart meter and some logic to react on the consumption and production for changing the limit.
created by Bernhard
i see. where i live it’s illegal to export any excess to the grid so in my case it should be always set to zero, no matter what. need to google it then, maybe will find a solution.
created by anonym
hey, thanks for detailed summary. after some time, would you recommend this product to invest or would you invest in some other product?
The inverter has been doing its job reliably for me for half a year. Yes, I can currently recommend the device: if the limitations mentioned do not pose a problem: above all: statistics only at 5-minute intervals.
created by Bernhard
thanks for reply, in the meantime I have seen some news about missing safety features.
source: https://www.youtube.com/watch?v=HQO5euDA_bk
news: https://www.linkedin.com/pulse/deye-microinverter-safety-scandal-faulty-devices-sold-karolina/?trk=public_post_main-feed-card_feed-article-content
created by Fuat
I have purchased this one (https://songsolar.com/en/products/balkonkraftwerk-800-watt-800watt-solaranlage-song-solar-gtb-800) and it comes with Tuya supported wifi invertor and data is real time (almost). I was able to integrate this with localtuya.
created by Fuat