Commissioning Zigbee2MQTT in Docker - step by step

Zigbee2MQTT is an open source Zigbee bridge which can be easily integrated into existing smart home solutions thanks to the MQTT network protocol. As an example, Zigbee2MQTT combined with MQTT broker Mosquitto and Home Assistant can collect, display, record and control data from Zigbee devices. The setup described here uses Docker as a base. Manufacturer's website: https://www.zigbee2mqtt.io
As the name implies, the setup requires an MQTT broker: see: MQTT - Broker Mosquitto, or for the complete setup see: Home-Assistant Docker Conbee 2 and Zigbee2MQTT / deCONZ.
Start Docker container with Zigbee2MQTT
I started Home Assistant in Docker, so Zigbee2MQTT have also to be started in Docker and cannot be installed via the AddOn Store. To start Zigbee2MQTT, the following Docker image can be used: "koenkk/zigbee2mqtt". Current Zigbee2MQTT version: 2.3.0 (found: 2025-05-04)
Docker Basics
Docker allows applications to be launched by command in a so-called container.A container is an isolated environment independent of the operating system (OS):
When a container is first launched, Docker independently loads all the necessary sources
from the internet.
Docker can be installed on Windows, macOS or an Linux Distribution
services:
  zigbee2mqtt:
      container_name: zigbee2mqtt
      restart: always
      image: koenkk/zigbee2mqtt
      volumes:
        - ./zigbee2mqtt-data:/app/data
        - /run/udev:/run/udev:ro
      ports:
        - 83:8080
      environment:
        - TZ=Europe/Vienna
The example uses bind mounts and not docker volumesto permanently store data. See: Docker data storage: Docker Volumes vs. Host Folders
The Docker container is started with the command "docker compose up" after creating the file "docker-compose.yml".
At the first startup, Zigbee2MQTT creates a configuration.yaml file in the zigbee2mqtt-data folder. In the file the hostname, username and password of the MQTT broker can be specified. In addition, for a new installation, the access to the ZigBee USB stick must be adapted.
# Home Assistant integration (MQTT discovery)
homeassistant: true

# allow new devices to join
permit_join: true

# MQTT settings
mqtt:
  # MQTT base topic for zigbee2mqtt MQTT messages
  base_topic: zigbee2mqtt
  # MQTT server URL
  server: 'mqtt://mqtt'
  # MQTT server authentication, uncomment if required:
  user: mqtt
  password: ???xx

# Serial settings
serial:
  # Location of CC2531 USB sniffer
  port: /dev/ttyACM0

# Enable the Zigbee2MQTT frontend
frontend:
  port: 8080
# Let Zigbee2MQTT generate a new network key on first start
advanced:
  network_key: GENERATE
The complete Docker-compose file with upstream Let`s Encrypt Reverse Proxy, MQTT - Broker Mosquitto and Home-Assistant I have noted on the following page: docker-compose.yml for Zigbee2MQTT, MQTT and HomeAssistant.
After startup, the web interface can be accessed in the browser using the port specified in the config file:
Web interface
At the first start the teach-in is active for all devices, accordingly they register automatically after a reset or when activating the connection mode. When using the MQTT - Broker and Home-Assistant, the devices are also automatically created in Home-Assistant with the following setting: "Home Assistant integration".


So that not everyone in the WLAN can access the management of Zigbee2MQTT, an authentication token should be set in the settings.
Authentication - Token
The frontend does not have a user administration, as a security only a token can be deposited:

The token must be specified in the browser after it has been activated for access to the web interface:

Zigbee - Bindings (Binding)
Admittedly, with deConz and Phoscon I did not manage to connect devices like the Philips Dimmer Switch directly to a light. In retrospect, I think the fault was not the cumbersome interface of deConz, but the fact that a switch must be disconnected from the coordinator before connecting to a light: This light has only now dawned on me with Zigbee2MQTT. The Zigbee2MQTT web frontend is clearly much clearer here, and after disconnecting the coordinator I was able to connect previously created groups consisting of several lights to a switch quite easily. The switching process works after the binding even if the Zigbee gateway is completely switched off and contributes significantly to the stability besides a fast reaction.
Create groups

Connect directly without gateway
The switches can be separated from the coordinator (Zigbee gateway) in "bindings" as described and then connected to specific devices or groups:


finally looks like this:

Firmware
For certain devices Zigbee2MQTT suggests new firmware versions and can install them if needed:

Not supported: the Yagusmart Zigbee Smart curtain switch.
If a device is listed as not supported, this can still be connected using an external converter file:
For this purpose, a file with the extension .js can be created in the data folder of Zigbee2MQTT:

To make the actions of the device visible, the log level can be set to "debug" in the configuration.yml file.
advanced:
  log_level: debug
...
external_converters:
  - FB56+CUR17SB2.2.js
When the switch is actuated, it thus reports in the log:
Received Zigbee message from 'Markise', type 'attributeReport', cluster 'genOnOff', data '{"onOff":0}' from endpoint 1 with groupID nullNo converter available for 'FB56+CUR17SB2.2' with cluster 'genOnOff' and type 'attributeReport' and data '{"onOff":0}'Received Zigbee message from 'Markise', type 'attributeReport', cluster 'genOnOff', data '{"onOff":1}' from endpoint 1 with groupID nullNo converter available for 'FB56+CUR17SB2.2' with cluster 'genOnOff' and type 'attributeReport' and data '{"onOff":1}'I couldn't really figure out from this how the .js file has to look like for the switch to work, but I found an example of a similar switch on the internet and was able to use that:
const fz = require('zigbee-herdsman-converters/converters/fromZigbee');
const tz = require('zigbee-herdsman-converters/converters/toZigbee');
const exposes = require('zigbee-herdsman-converters/lib/exposes');
const reporting = require('zigbee-herdsman-converters/lib/reporting');
const extend = require('zigbee-herdsman-converters/lib/extend');
const e = exposes.presets;
const ea = exposes.access;

const definition = {
    zigbeeModel: ['FB56+CUR17SB2.2'],
    model: 'FB56+CUR17SB2.2',
    vendor: 'Feibit Co.Ltd',
    description: 'Smart Zigbee 3.0 curtain controller',
    fromZigbee: [fz.tuya_cover_options],
    toZigbee: [tz.cover_state],
    whiteLabel: [{vendor: 'Zemismart', model: 'ZW-EU-01', description: 'Smart light relay - 1 gang'}],
    meta: {configureKey: 2},
    exposes: [e.cover_position(), exposes.enum('moving', ea.STATE, ['UP', 'STOP', 'DOWN'])],
    configure: async (device, coordinatorEndpoint, logger) => {
        const endpoint1 = device.getEndpoint(1);
        await reporting.bind(endpoint1, coordinatorEndpoint, ['genOnOff']);
        await reporting.onOff(endpoint1);
        await reporting.bind(endpoint1, coordinatorEndpoint, ['closuresWindowCovering'])
        device.powerSource = 'Mains (single phase)';
        device.type = 'EndDevice';
        device.save();
    },
};

module.exports = definition;
Source: github.com/Koenkk/zigbee-herdsman-converters/issues/2489 bzw. github.com/Koenkk/zigbee-herdsman-converters/blob/master/devices/nue_3a.js
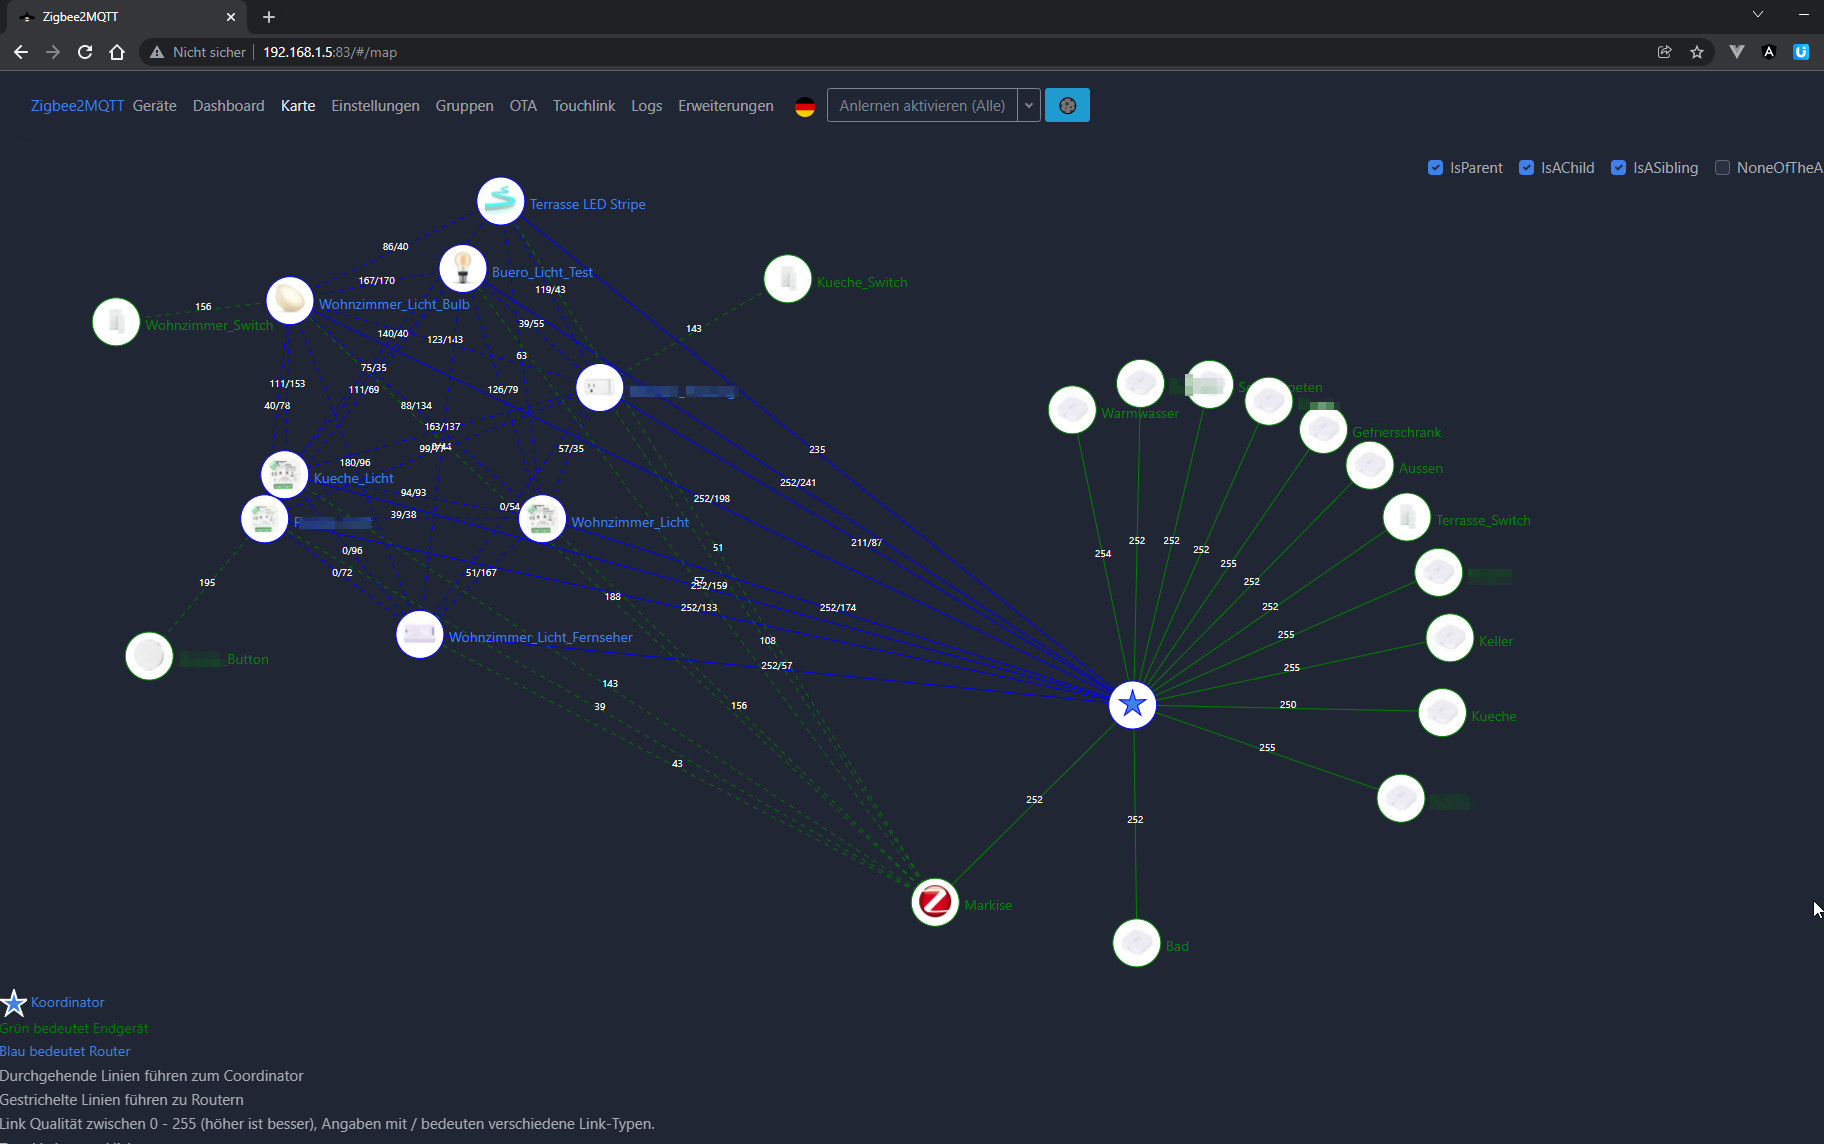
Mesh network overview
The "Map" tab graphically displays the Zigbee mesh network. For a better overview, other connections disappear in the background when clicking on a device.
Update to version 2.0
The update to version 2.0 contains some breaking changes, so please read the documentation and check the migration log after the update process. It may be necessary to adjust the configuration file and add a serial.adapter. Some users reported a "JavaScript heap out of memory" error during the upgrade,see: https://github.com/Koenkk/zigbee2mqtt/discussions/24198.
Conclusion
Compared to deConz and Phoscon , I find the management of devices in Zigbee2MQTT much clearer . All functions are collected in one interface and can be operated from a smartphone if needed. For an integration with HomeAssistant, see: Home-Assistant Docker Conbee 2 and Zigbee2MQTT / deCONZ and Zigbee2MQTT vs deCONZ and Phoscon.
 ({{pro_count}})
{{percentage}} % positive
 ({{con_count}})
THANK YOU for your review!
Questions / Comments
(sorted by rating / date) [all comments (best rated first)]