Self-hosting GIT repositories: launch GitLab as a Docker container

If you want to host your Git repositories yourself, GitLab is an alternative to GitHub. GitLab offers a convenient web interface for managing, editing and deploying Git projects.
Docker Basics
Docker allows applications to be launched by command in a so-called container.A container is an isolated environment independent of the operating system (OS):
When a container is first launched, Docker independently loads all the necessary sources
from the internet.
Docker can be installed on Windows, macOS or an Linux Distribution
Thanks to Docker, the installation is ready to go in a few minutes. However, there should be enough free RAM, because during operation GitLab hogs about 4 GB and also constantly some CPU in the background. In the process, the web interface on my NAS reacts a bit sluggishly, so I have since replaced GitLab with Gitea, see: Gitea Startup. For larger teams with performant hardware, GitLab offers more features than Gitea, especially towards integration and delivery: CI/CD.
For GitLab to get a free Let's Encrypt SSL certificate, the following setup is required for the example: Traefik-Reverse-Proxy
To ensure that GitLab is can be reached securely from the Internet, I use a Let's Encrypt reverse proxy. At first I used Nginx as Reverse-Proxy, but later replaced it with Traefik. The reverse proxy provides an encrypted HTTPS connection and makes it possible to run multiple websites on one server.
Step by step GitLab and Docker including access from the internet
Hardware requirement:- Almost any hardware can be used for the Docker installation. For example, a virtual server of a provider, or for home: a Mini-PC, notebook, MAC, a NAS: QNAP, Synology or any other hardware with x68-64 architecture on which Windows or Linux can be installed.
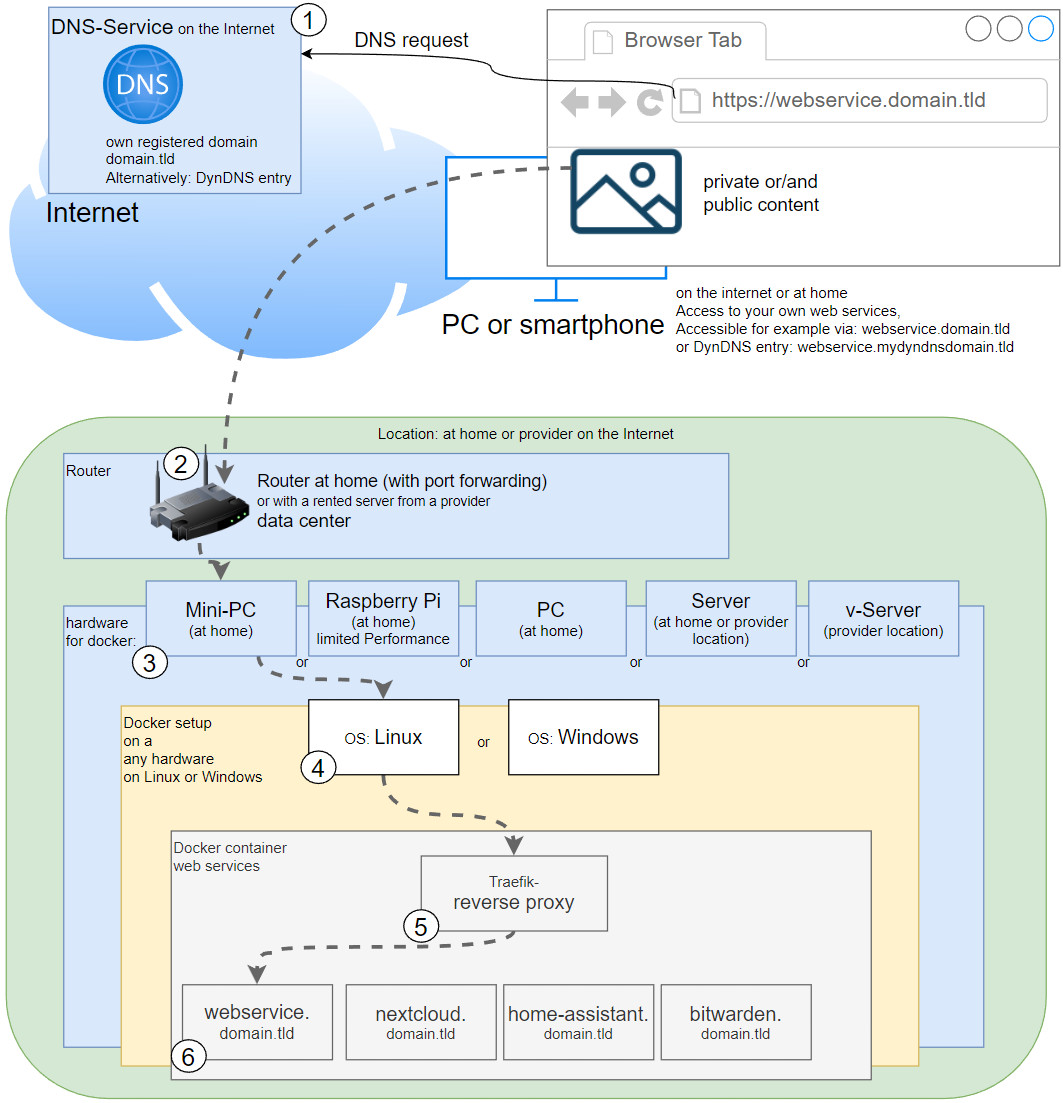
Schematic representation: Access from the Internet
- Own registered domain, see domain and its management.
- Cloudflare or Reverse Proxy:
- Cloudflare Tunnel Service or alternatively:
- Port forwarding and Reverse proxy with Let's Encrypt certificate
Container for GitLab:
docker-compose.yml
When using the following docker-compose.yml file, only the domain used needs to be adjusted:
services:
 web:
  image: 'gitlab/gitlab-ee:latest'
  restart: always
  hostname: 'gitlab.domain.tld'
  environment:
    GITLAB_OMNIBUS_CONFIG: |
      external_url 'https://gitlab.domain.tld'
      nginx['listen_port'] = 80
      nginx['listen_https'] = false
      nginx['proxy_set_headers'] = {
      	"X-Forwarded-Proto" => "https",
      	"X-Forwarded-Ssl" => "on"
      }

  #Labels for ReverseProxy, see: https://www.libe.net/en-traefik
  labels:
      - "traefik.enable=true"
      - "traefik.http.routers.mailserver.rule=Host(`gitlab.domain.tld`)"
      - "traefik.http.routers.mailserver.entrypoints=web"
      - "traefik.http.routers.mailserver.entrypoints=websecure"
      - "traefik.http.routers.mailserver.tls.certresolver=myresolver"
  expose:
      - "80"
  #For direct test access, remove "#" in the following 2 lines. Call: http://localhost:83 or http://ServerIP:83
   #ports:
    #- "83:80"
  volumes:
    - './config:/etc/gitlab'
    - './logs:/var/log/gitlab'
    - './data:/var/opt/gitlab'
  restart: always

#Without using a reverse proxy (https://www.libe.net/en-traefik) the webproxy network is likely to be missing
#and the following lines can be removed or commented out. Alternatively, the network can be created with "docker network create webproxy".
networks:
  default:
    name: webproxy
    external: true
The command docker compose up -d starts Gitlab:
docker compose up -dAt the first start a root password can be assigned via the web interface.
 ({{pro_count}})
{{percentage}} % positive
 ({{con_count}})