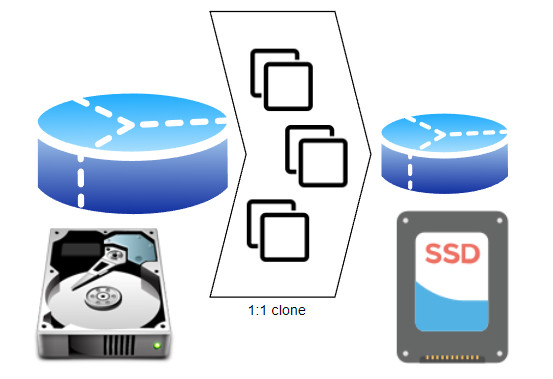
clone a large hard disk to a smaller one with the help of free tools

Free tools for cloning a hard disk cannot usually clone a large partition and thus a large hard disk onto a smaller one. Thanks to the command "Shrink Volume" in the disk management of Windows, the hard disk can be prepared for the cloning process and then cloned with the help of open source tools. Thus, for example, a Windows installation with all data can be moved to another disk.To speed up the PC with very little effort, a smaller SSD is usually used as the target. With the procedure described here, the cloning process also works from a conventional hard disk to a smaller SSD, without any commercial tools. You prefer watching a video? This article is also presented as YouTube-Video.
Aim of this article
transfer all data from one hard diskto another
Effort
Reading time: approx. 8 MinutesPrerequisite
computer, source hard disk,boot medium, target hard disk
The cloning process is independent of the type of hard disk used, I have tested this withWindows 8 / 10 and Windows 11 and under Linux.
Example: clone a large hard disk to a smaller one
In my tests, I cloned, among other things, a 130GB hard drive with existing Windows 11 installation to a 40GB hard drive. The actual hard drive size doesn't matter when cloning, provided the occupied space of the source hard drive is not larger than the destination hard drive. If you run out of space, you should delete unneeded files or move them to an external hard drive.
Since free image tools like dd (Disk Dump) are block-based and thus cannot detect the actual data on the hard disk, we have to help a bit when cloning to a smaller target. In preparation for the cloning process, we need to shrink the data partition of the source disk. (Don't worry, the disk can always be made larger again later).
Shrinking the partition is slightly different in Windows and Linux, the cloning process is identical for both operating systems.
Recovery partition
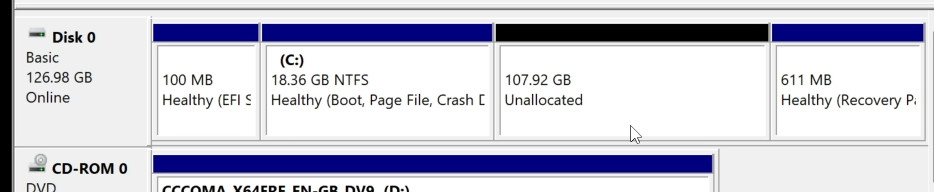
Windows 11 has a recovery partition at the end of the disk. Since the partition is not absolutely necessary for Windows operation, it does not have to be cloned. If you want to create the recovery partition again after the cloning process, you should execute the command "reagentc /disable" in the command prompt beforehand, this writes the contents of the partition to a file in the file system, see: Windows : create a missing recovery partition.
C:\WINDOWS\system32> reagentc /disable
REAGENTC.EXE: Operation Successful.
Alternatively, the partition is recreated via the installation medium during a Windows upgrade.
Shrinking the partition
Windows
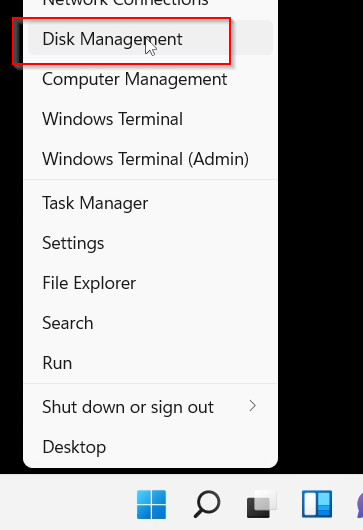
To shrink the partition I change to the Disk Management: (In Windows 10 just search for "Disk Management" or in Windows 11: right click on the Windows icon and "Disk Management").
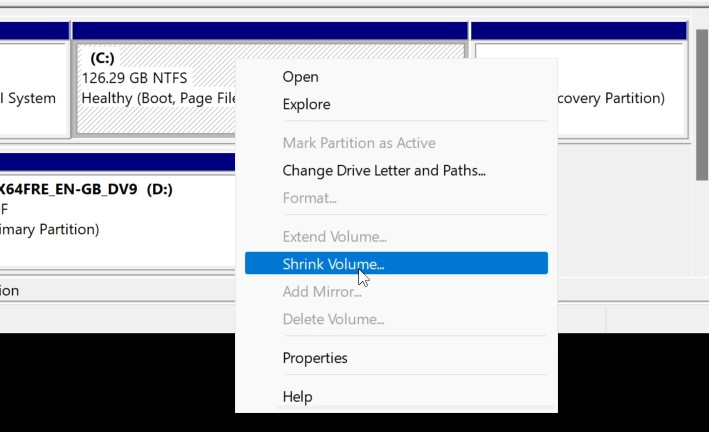
In Disk Management we can shrink the C: partition, preferably as small as possible. The partition can be extended again to any size after the cloning process.
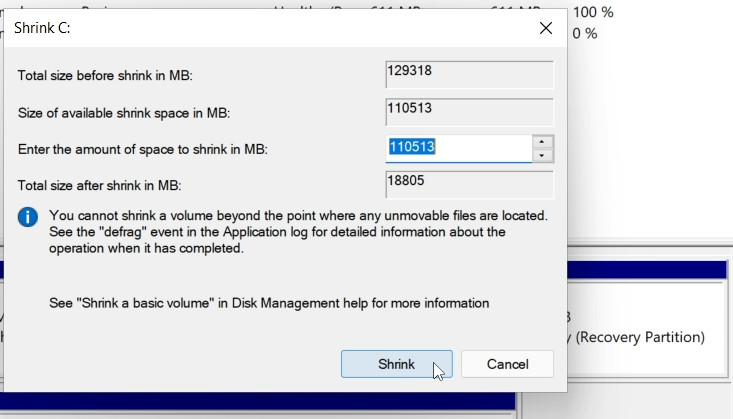
Windows 11 probably has an additional recovery partition at the end of the disk here. Since the partition is not absolutely needed for Windows to run, we don't need to clone the partition, accordingly we can ignore it at this point. And: Attention with the procedure described here, the recovery partition is lost, but we gain additional disk space. When upgrading Windows via the installation media, the recovery partition would be created again. If the shrinking is only possible to a certain value, but there is still enough free space on the hard disk, defragmenting the hard disk may help.
If dd (Disk Dump) is used, the recovery partition may not be cloned at all or only partially, depending on the disk space of the target disk, and must be cleaned up later. The size of the EFI and C partition must be at the beginning of the disk and must not exceed the space of the target disk.
Reducing the size of the partition for a Linux operating system, here OMV
If you want to clone a large hard disk to a small one on a Linux computer, you can shrink the partition using gparted:
To get my NAS installation OMV from a SATA 500GB harddisk to a 240GB SSD, I booted the PC with an Ubuntu Live-CD, started Gparted and downsized the originalHDD /dev/sdb1 from 458 to 215GB. At the end of the harddisk is a swap partition, I ignore this for now ...
Disk /dev/sdb: 465.8 GiB, 500107862016 bytes, 976773168 sectors
Units: sectors of 1 * 512 = 512 bytes
Sector size (logical/physical): 512 bytes / 4096 bytes
I/O size (minimum/optimal): 4096 bytes / 4096 bytes
Disklabel type: dos
Device     Boot     Start       End   Sectors   Size Id Type
/dev/sdb1  *         2048 960702463 960700416 458.1G 83 Linux
/dev/sdb2       960704510 976771071  16066562   7.7G  5 Extended
/dev/sdb5       960704512 976771071  16066560   7.7G 82 Linux swap / Solaris
The following procedure:
- use dd to clone the 500GB to the 240GB HDD.
- Create a new swap partition at the end of the 240GB HDD.
sudo dd if=/dev/sdb of=/dev/sdadd: writing to '/dev/sda':
No space left on device
468862129+0 records in
468862128+0 records out
240057409536 bytes (240 GB, 224 GiB) copied, 22352.8 s, 10.7 MB/s
deleted dev/sda2 and created an extended partition with Linux Swap.
At the first boot with the cloned disk it was then necessary to run fsck ... fsck /dev/sda1
BIOS settings - disable secure boot
On modern computers with UEFI BIOS or SATA disks you may have to deactivate Secure Boot before the actual cloning process, otherwise the computer will not boot from CD / DVD, or Clonezilla may not recognize the hard disk. Of course the boot order is important: CD/DVD first.
HDD clone large to small with dd / Clonezilla
After the source harddisk is prepared, we can now connect a 2nd harddisk to the system and clone the disk to it. Up to Windows 10 I used CloneZilla for the cloning process, for Windows 11 I used the dd command which is part of most Linux distributions or Live Linux CDs and therefore also available in the shell of the CloneZilla boot medium.
So instead of CloneZilla, an Ubuntu setup media could also be used. Since Clonezilla is relatively slim, I use here the CloneZilla CD for booting. (Insert CD and select boot from CD / DVD, see Boot the computer from USB or DVD - UEFI o. BIOS) . To download, see: https://clonezilla.org/ Version: 3.3.1 (found: 2026-02-24)
After selecting the keyboard settings I start the shell:

First I use the command "fdisk -l" to display all hard disks:
sudo fdisk -lAfter that, a simple dd command is all that is needed to clone one disk to another:

because the data of the target hard disk will be overwritten without asking!
Here are my used commands for the actual cloning process, be sure to use correct if=(Source) and of=(Target) Devices!:
sudo dd if=/dev/sdb of=/dev/sda bs=100M status=progresssee also: use dd to clone the hard disk block by block or to create an image
Then, remove the large source hard disk, restore the original settings in the BIOS and boot the PC with the cloned target hard disk:
Finally: Adjust the partition of the target hard disk (Windows).
When using dd, the disk size was not correct after the cloning process. Accordingly, the size of the original hard disk was displayed for me, which I could only correct by using diskpart in the command prompt:
Only after I deleted the actually non-existent recovery partition with diskpart, the disk size was corrected:
Command Prompt:
diskpart
list disk
select disk xx
list partition
select partition xx
delete partition override
Of course, the number of the disk (e.g. select disk 0) and the number of the partition (e.g. select partition 4) must be adapted to the commands:


Afterwards I could extend the C partition by the remaining free space, for this again back into the disk management and adapt the partition size to the new conditions, by means of volume extend:


Video
Conclusion
By preparing the hard disk in the operating system: in Windows or Linux, it is possible with free tools, as an example dd, to clone a large hard disk to a smaller one.
 ({{pro_count}})
{{percentage}} % positive
 ({{con_count}})