Field report: 3D printer - Geeetech Prusa i3 pro B

3D printer kits have become affordable. The new hobby can be purchased for under 200$. What you buy is a device that initially consumes a lot of time, but offers completely new possibilities. Once the printer is assembled, it's time for fine-tuning. I spent some time to choose the right software (Slicer) and to understand the different setting parameters. In addition to the kits, there are also pre-assembled models, which can save quite a bit of time during commissioning. In addition, the standard parameters of the well-known slicers usually provide a good starting point for a quick start.
Choice of software
In addition to the hardware, a program is also needed to create the control files: the slicer. The slicer is a small program that, in the case of an FDM printer, translates 3D objects into a machine language (G-code), which is a set of coordinates that a 3D printer must move to in order to brush the object together. In the process, the slicer breaks the object into thin layers and creates a motion description consisting of coordinates, which can then be played back and the object printed by adding material, also described in G-code.
The parameters used in the slicer may need to be tuned to the printer; accordingly, the fine tuning of the printer is done in the slicing software. The setting parameters can be interpreted differently depending on the slicer. See also: free slicers in comparison: PrusaSlicer vs Cura vs Slic3r.
Support printing
Since a classic FDM 3D printer cannot print into the air, overhanging parts of the object, if present and necessary, can be underlaid by the slicer with a support structure printed along with it. Once the print is complete, the support can then be easily removed.
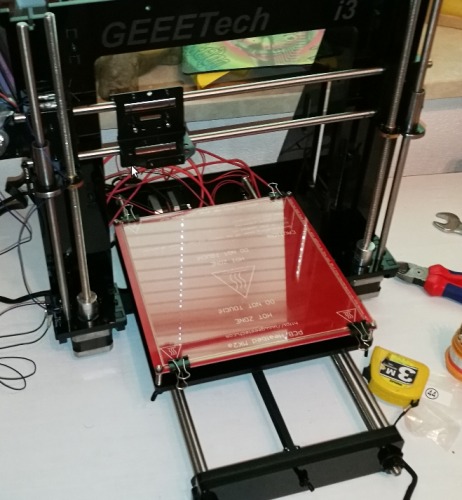
My 3D printer setup:
https://www.geeetech.com/acrylic-geeetech-prusa-i3-pro-b-3d-printer-diy-kit-p-917.html
The setup is very easy thanks to the instructions and takes about 8 hours. The cable routing leaves some room for interpretation, but should be able to be implemented by any hobbyist without problems.
Commissioning
At the first startup, the running direction of the X-axis was reversed, which was quickly fixed by a firmware update, see: www.geeetech.com/forum/viewtopic.php?f=10&t=17046 and http://www.geeetech.com/forum/viewtopic.php?f=13&t=17181. Later, I updated the firmware to Marlin 1.1.9, see the end of this article ...
X-Offset
To make sure that the left-front edge of the glass plate corresponds exactly to the coordinates X=0 and Y=0, the position can first be changed in the menu of the printer display with Prepare Move-Axis, with Set home offsets it can be saved.
Or via the Octopi terminal with M206 X6 (6 stands for 6mm offset) and then in the menu on Store
Calibrate: Distance to glass plate:
At first, I was a bit afraid for the glass plate, after all the Nozzle (nozzle) scratches on it if the distance to the print bed is too little. The coarse distance is adjusted with a screw, the fine adjustment is done at the 4 corners of the glass plate with a wing nut. When calibrating, there should be space for a sheet of paper between the nozzle and the glass plate at each of the four corners. Later I got myself a heat-resistant tape, which can be simply stuck on the glass plate. The tape protects the glass plate and gives the printed objects a rougher texture instead of a smooth surface.
Notes about the firmware update
A new firmware can be obtained from the following Github page: https://github.com/MarlinFirmware/Marlin/tree/bugfix-1.1.x/Marlin/example_configurations/Geeetech/Prusa%20i3%20Pro%20B
and http://marlinfw.org/meta/download/
Marlin 1.1.9
The Arduino app from the Windows Store can be used to install the firmware: Version 1.8.15.0
Here are my current customizations:
configuration.h
#define Z_SAFE_HOMING_Y_POINT 0

#define Z_SAFE_HOMING_X_POINT -12

#define DEFAULT_AXIS_STEPS_PER_UNIT   { 80, 80, 2550, 150 }  //150 da Filament-Antrieb modifiziert


#define FIL_RUNOUT_PIN 24
#define FILAMENT_RUNOUT_SENSOR

 #define FILAMENT_RUNOUT_SCRIPT "M600 X100 Y0 Z1 E3 L10 U100"

#define NOZZLE_PARK_FEATURE

 #define X_MIN_POS -9

 #define Z_SAFE_HOMING_X_POINT -9

/**
* Stepper Driver Änderungen
*/

#define INVERT_X_DIR true -> false
#define INVERT_Y_DIR true -> false
#define INVERT_Z_DIR false -> true
#define INVERT_E0_DIR true -> false
pins_GT2560_REV_A.h
#define Z_MAX_PIN          -1

#define FIL_RUNOUT_PIN 24
Configuration_adv.h:
#define ADVANCED_PAUSE_FEATURE

#define PARK_HEAD_ON_PAUSE // Park the nozzle during pause and filament change.
#define HOME_BEFORE_FILAMENT_CHANGE // Ensure homing has been completed prior to parking for filament change

#define FILAMENT_LOAD_UNLOAD_GCODES // Add M701/M702 Load/Unload G-codes, plus Load/Unload in the LCD Prepare menu.
#define FILAMENT_UNLOAD_ALL_EXTRUDERS

#define ADVANCED_PAUSE_PURGE_LENGTH         10  // (mm) Length to extrude after loading.

/**
* As described above, except for the bed (M140/M190/M303).
*/
#define WATCH_BED_TEMP_PERIOD 90 // Seconds Anstelle 60


 #define FILAMENT_CHANGE_UNLOAD_FEEDRATE     60  // (mm/s) Unload filament feedrate. This can be pretty fast.

#define FILAMENT_UNLOAD_RETRACT_LENGTH 1 // (mm) Unload initial retract length.
#define FILAMENT_UNLOAD_DELAY 1 // (ms) Delay for the filament to cool after retract.
({{pro_count}})
{{percentage}} % positive
 ({{con_count}})