Install Grub setup and set up Linux bootloader

Ubuntu and most other Linux-based operating systems use GRUB2 as a boot loader. In GRUB, settings such as the default operating system or the use of a background image can be set. In addition, GRUB can be configured to load multiple operating systems: Dualboot.
Grub can start the most different operating systems and reads the following file systems: ext2, ext3, UFS, UFS2, ReiserFS, FAT, NTFS, ISO9660, JFS, Minix, FFS, XFS
Install or repair Grub afterwards
If the GRUB bootloader is no longer working properly, it can be repaired by booting the Ubuntu Live DVD. (Ubuntu Live DVD see: Install Ubuntu or start live system; Ubuntu Live USB Stick, see: bootable live USB stick with Ubuntu; for details on booting from DVD / USB see: Booting the computer from USB or DVD - UEFI o. BIOS )
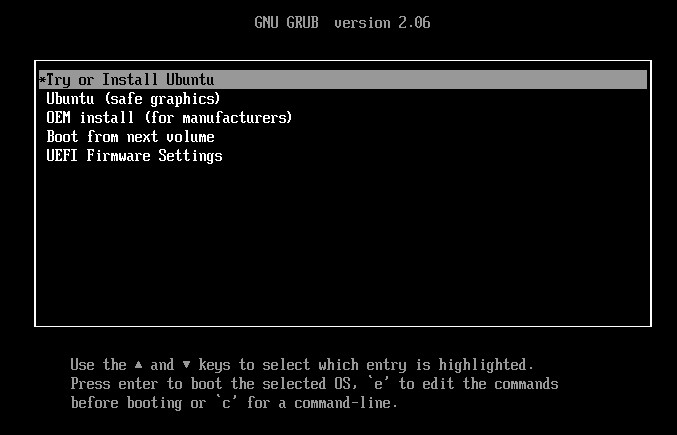
To boot the Ubuntu live system when booting from the disk:
"Try Ubuntu without installation" select:
The following example is a dual-boot installation:
Windows was installed at the beginning and Linux at the end of the hard disk.
The partitions can be displayed in the terminal with sudo fdisk -l:
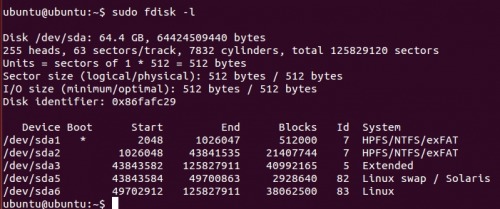
Then select the hard disk with the existing Linux installation and mount it, in my case: sda6:
sudo mount /dev/sda6 /mnt
sudo mount -o bind /dev /mnt/dev
sudo mount -o bind /sys /mnt/sys
sudo mount -t proc /proc /mnt/proc
sudo cp /proc/mounts /mnt/etc/mtab
sudo chroot /mnt /bin/bash
and finally the actual reinstallation of the Grub bootloader:
grub-install /dev/sda
grub-install --recheck /dev/sda
update-grub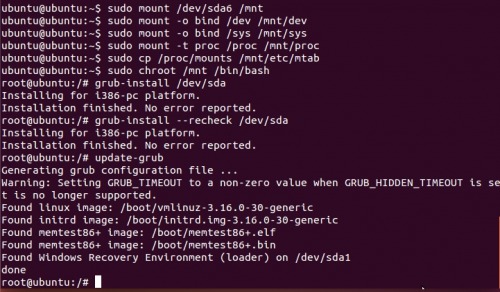
At this point, an existing Windows installation is also found and included.
Customize Grub
Originally Grub was configured in the menu.lst file. Since Ubuntu 10.04 there is no menu.lst anymore, Grub2 should be customized with the file /etc/default/grub.
Set default operating system
Normally Linux is loaded automatically after a certain timeout. The behavior can easily be adjusted in the file /etc/default/grub:

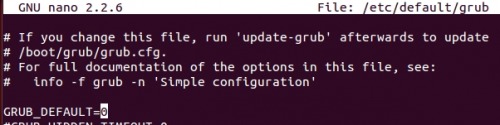
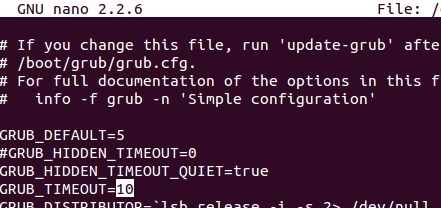
GRUB_DEFAULT=0
loads the first entry in the menu; 1 the second entry, ...
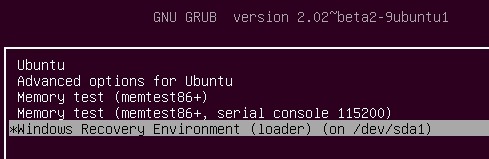
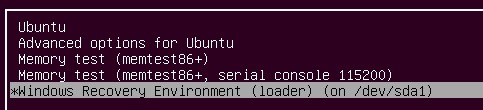
in the following example the Windows installation is the entry number 4:
GRUB_DEFAULT=saved
boots the last operating system used.
In addition, a label can be used for loading, e.g.
GRUB_DEFAULT="Windows Recovery Environment (loader)"
The wait time of the bootloader can be set with "GRUB_TIMEOUT":
The background image with:
GRUB_BACKGROUND="/home/user/Pictures/Background.png".
Important: Take over the settings
The following command is used to take over the settings:
sudo update-grub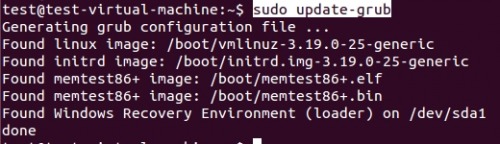
"update-grub" then writes the changes into the file /boot/grub/grub.cfg, only then they are active.
Boot Flag
If Linux does not boot after Windows has been installed, this could be caused by the boot flag.
The boot flag points in this case to the Windows and no longer to the Linux partition.
The GRUB menu is no longer displayed, Windows starts automatically.
Temporarily Linux can be started by pressing the key 1 shortly before Windows starts.
Permanently the error can be solved with the help of the Gnome Partition Editor. For the Windows partition the flag boot must be removed under "manage flags" and the setting for the Linux partition must be activated.
 ({{pro_count}})
{{percentage}} % positive
 ({{con_count}})