Mirror hard disk in Windows 10/11 - Software Raid - Plex [Explained]
![Preview Mirror hard disk in Windows 10/11 - Software Raid - Plex [Explained]](/storage/300x86/63c6d90384fba.webp)
Mirroring is the simultaneous writing to two hard disks, also called Raid 1. Mainly a hard disk mirroring is used for the protection against the failure of a hard disk. If a hard disk fails, the data is available on the second disk, the computer continues to work and can be started with the setup described here even after the failure. Mirroring the Windows partition is very easy, but not setting up the partitions so that it is possible to boot from the 2nd hard disk in the event of an error. This article is also available as Youtube Video.
General
In some internet articles mirroring is confused with cloning, see also: hard disk cloning, copying, image tools. A mirror is something like the permanent cloning of the hard disk, so the constant comparison of both hard disks. For this reason it would also be conceivable to clone a hard disk via "mirroring". To do this, the mirror could be added as described here, and then removed again.
Windows includes a solution for mirroring hard disks. In addition, many motherboard manufacturers offer the possibility to mirror hard disks in the BIOS. In this case, the controller does the work and presents two mirrored disks as one to the operating system. As an alternative, the mirror can be set up on Windows if a Home version isn't currently in use. This variant of course requires a bit more system resources, but is hardware-independent. Mirroring hard disks on Windows is by no means new, Windows has supported it for decades.
Prerequisite: dynamic disks
As a basis for mirroring, the hard disk must be converted into a dynamic disk. Originally, dynamic disks were an innovation, but today they are rather exotic and more a relic of times past. Even though converting a BASIS disk to dynamic usually makes no difference in practice, the conversion should be considered briefly because it cannot be easily undone. Mirroring the Windows partition (c:) is initially a very simple matter and works almost self-explanatory. Anything but self-explanatory is the handling of the additional boot and system partitions. To prepare the computer for the failure of the primary hard disk, the system partitions must be created in the correct order. To ensure that the secondary hard disk gets the same partition IDs, it must be converted to dynamic only last. Since mirroring the C disk creates the partition on the second disk by itself, but this is not at the end of the disk by default, this is a bit of a chicken-and-egg problem. I was only able to solve the problem by creating a partition with the exact size of the C partition as a placeholder for the mirror on the second hard drive, and removing it later.
Originally, I described mirroring a legacy disk in this post. Since today UEFI partition layouts are used to a large extent, I have adapted the article. If you still use the legacy boot mode on your PC, you can change it to UEFI as follows: Change Windows 10 BIOS (Legacy) to UEFI Boot.
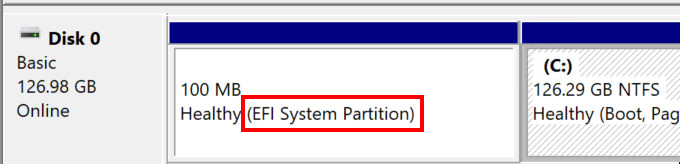
The easiest way to determine whether EFI is in use is in the Disk Management. In the case of UEFI, there is an EFI system partition at the beginning of the boot hard disk:
A prerequisite for mirroring the system disk is, of course, a second disk with sufficient storage space.
Setting up a Windows 10 / 11 mirror: UEFI boot
For a better overview, I have summarized the individual steps:
| Additional data medium | Install additional disk with at least the same storage space |
|---|---|
| Initialize disc | Initialize new disk with GPT: Type: Basic |
| Create partitions | Create partitions on the additional disk equal to the primary disk |
| Convert disks | Convert both disks to dynamic disks. |
| Prepare partition for mirror | Delete placeholder partition again |
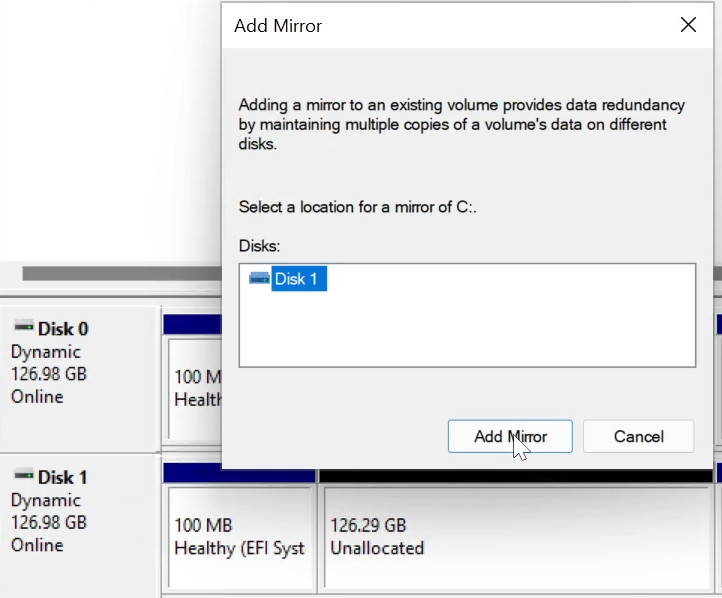
| Add mirror | Right-click on the c-drive of the primary disk |
| Fill EFI partition | Transfer data from primary EFI partition to secondary disk |
| Fill recovery partition | Transfer data of the recovery partition to the secondary disk |
The creation of the mirror can be started from the Disk Management:
When starting the disk management, it wants to initialize the new disk for our mirror first:


Reading the partitions of the primary hard disk can be done with in Windows PowerShell with the command "get-partition -DiskNumber 0":

PS C:\Windows\system32> get-partition -DiskNumber 0


   DiskPath: \\?\scsi#disk&ven_msft&prod_virtual_disk#5&32d19c0&0&000000#{53f56307-
b6bf-11d0-94f2-00a0c91efb8b}

PartitionNumber  DriveLetter Offset                      Size Type
---------------  ----------- ------                      ---- ----
1                           1048576                   100 MB System
2                           105906176                  16 MB Reserved
3                C           122683392              126.29 GB Basic
4                           135722434560              611 MB Recovery
If the partitions or their sizes differ, this should be taken into account in the following commands.
If the disk has already been converted to dynamic, the command returns an error:
get-partition : Es wurden keine MSFT_Partition-Objekte gefunden, bei denen die DiskNumber-Eigenschaft gleich "0" ist. Überprüfen Sie den Wert der Eigenschaft, und versuchen Sie es erneut.
In Zeile:1 Zeichen:1
+ get-partition -DiskNumber 0
+ ~~~~~~~~~~~~~~~~~~~~~~~~~~~
    + CategoryInfo          : ObjectNotFound: (0:UInt32) [Get-Partition], CimJobException
    + FullyQualifiedErrorId : CmdletizationQuery_NotFound_DiskNumber,Get-Partition
The reason: Windows does not offer support for managing dynamic disks via Windows PowerShell until today. The remedy is the command prompt with the good old command: diskpart. Here is the output of the disk, after converting to dynamic:
DISKPART> select disk 0

Disk 0 is now the selected disk.

DISKPART> list partition

  Partition ###  Type              Size     Offset
  -------------  ----------------  -------  -------
  Partition 1    System             100 MB  1024 KB
  Partition 5    Dynamic Reserved  1024 KB   101 MB
  Partition 2    Reserved            15 MB   102 MB
  Partition 3    Dynamic Data       126 GB   117 MB
  Partition 4    Recovery           611 MB   126 GB
When converting to dynamic, partition 5 has been added: "Reserved" is therefore 1 MB smaller: 15 MB instead of 16 MB.
The secondary disk should not yet be converted to dynamic. If the disk is already on dynamic, it can be converted to BASIC. For the creation of the partitions I have compiled the following PowerShell commands:
get-partition -DiskNumber 1 | Remove-Partition #-Confirm:$False
New-Partition -DiskNumber 1 -Size 100MB -GptType "{c12a7328-f81f-11d2-ba4b-00a0c93ec93b}"
New-Partition -DiskNumber 1 -Size 16MB -GptType "{e3c9e316-0b5c-4db8-817d-f92df00215ae}"
New-Partition -DiskNumber 1 -Size $($(get-volume | Where-Object DriveLetter -eq c).size)
New-Partition -DiskNumber 1 -GptType "{de94bba4-06d1-4d40-a16a-bfd50179d6ac}" -UseMaximumSize
The partition for the C-drive is created with it equal to the primary C-partition and serves only as a placeholder, so that the recovery partition can be created now already and gets the same ID as the primary disk.

As already mentioned, we convert the hard disks to "dynamic" last, so that the layout of the partitions corresponds as much as possible to the layout of the primary hard disk.

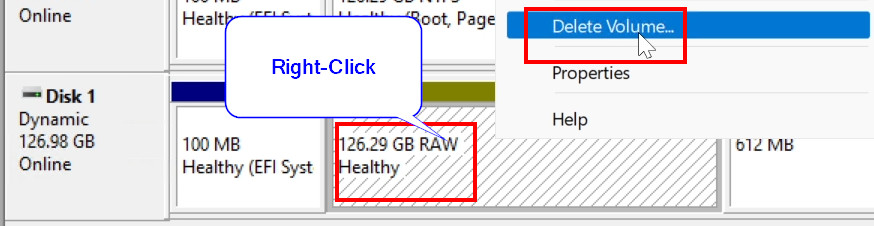
The future C partition, or its mirror, is located in the middle, so deleting the previously created partition gives us a free space at the same position:
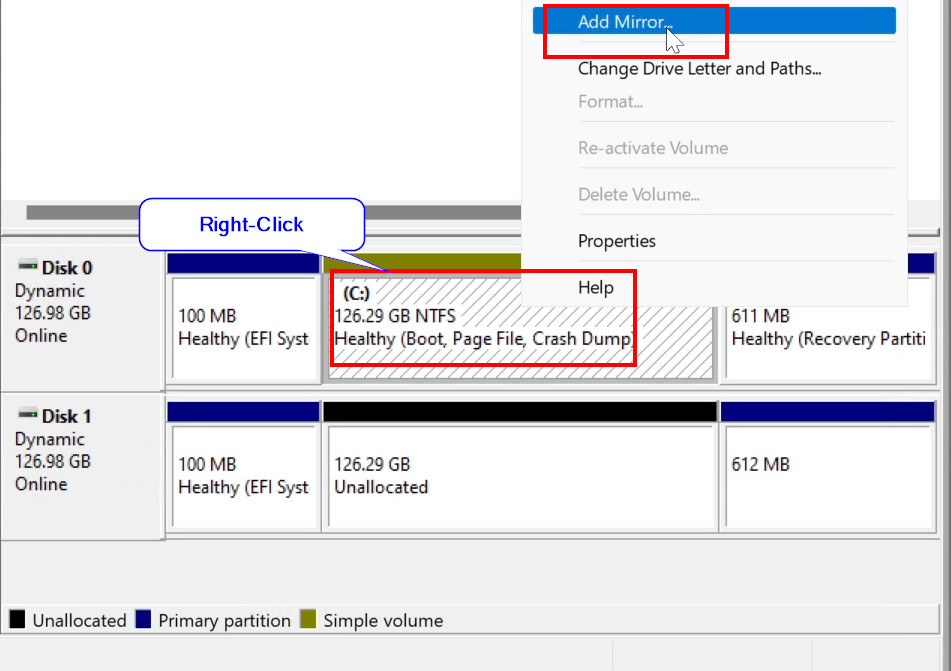
Now comes the most important part, adding the reflection:
Windows now transfers all data blocks of the C drive to the second disk in the background:
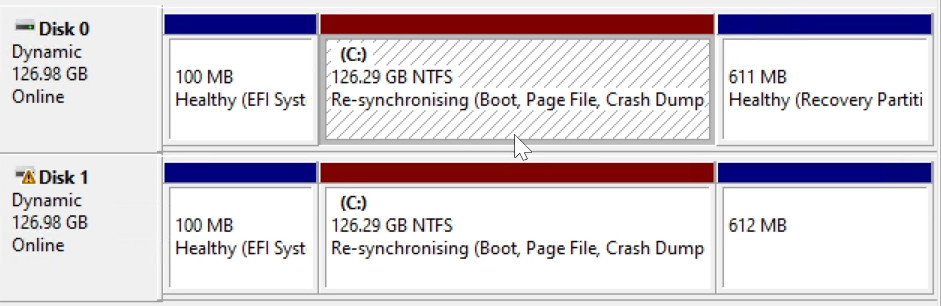
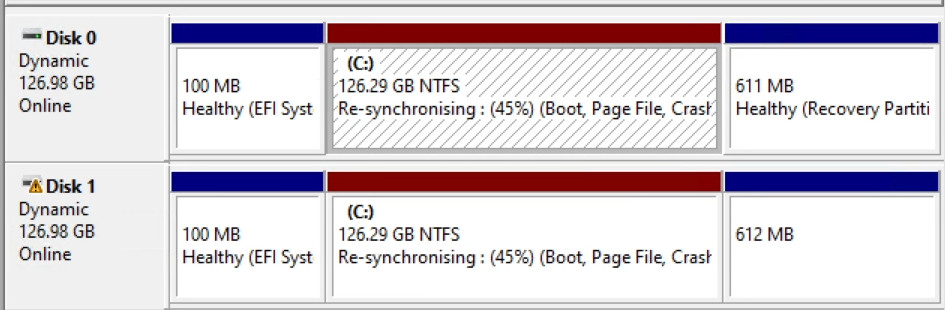
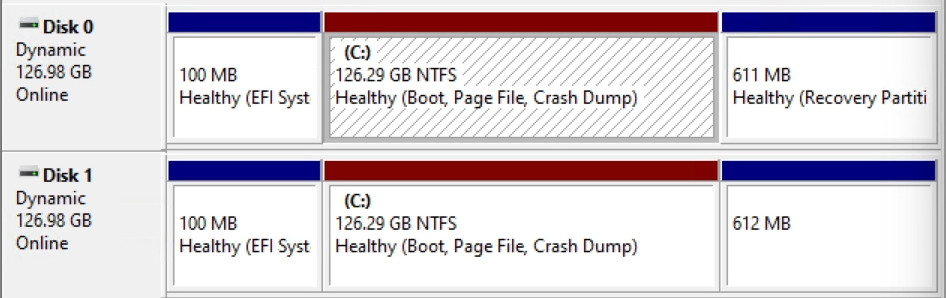
If both data carriers are synchronous, the status is displayed as "Healthy":
Fill EFI partition
So that the computer can boot later also from the secondary disk, I transfer all data of the EFI partition to the partition of the second disk

In diskpart I assign the drive letter P. for the EFI partition of the primary disk: , for the secondary disk partition: S:
C:\Windows\system32>diskpart
DISKPART> select disk 0
Disk 0 is now the selected disk.
DISKPART> select partition 1
Partition 1 is now the selected partition.
DISKPART> assign letter=p
DiskPart successfully assigned the drive letter or mount point.
DISKPART> select disk 1
Disk 1 is now the selected disk.
DISKPART> select partition 1
Partition 1 is now the selected partition.
DISKPART> format fs=fat32 quick
  100 percent completed
DiskPart successfully formatted the volume.
DISKPART> assign letter=s
DiskPart successfully assigned the drive letter or mount point.
exit
The BCD store cannot be copied on the fly, so I exported it, copied it, and then renamed it back to BCD:
DISKPART> exit
Leaving DiskPart...

C:\Windows\system32>p:
P:\>cd EFI\Microsoft\Boot
P:\EFI\Microsoft\Boot>bcdedit /export P:\EFI\Microsoft\Boot\BCD2
P:\EFI\Microsoft\Boot>robocopy p:\ s:\ /e /r:0
P:\EFI\Microsoft\Boot>rename S:\EFI\Microsoft\Boot\BCD2 BCD
P:\EFI\Microsoft\Boot>del P:\EFI\Microsoft\Boot\BCD2
(see: https://learn.microsoft.com/en-us/troubleshoot/windows-server/backup-and-storage/set-up-dynamic-boot-partition-mirroring)
The following commands remove the previously used drive letters P and S again:
P:\EFI\Microsoft\Boot>c:
C:\Windows\System32>diskpart
Microsoft DiskPart version 10.0.22000.1

DISKPART> select volume s
DISKPART> remove
DISKPART> select volume
DISKPART> select volume p
DISKPART> remove
DiskPart successfully removed the drive letter or mount point.
Fill recovery partition
The following commands can be used to transfer the contents of the recovery partition from disk 0 to disk 1. Therefore, drive letters must again be assigned for access.
DISKPART> select disk 0

Disk 0 is now the selected disk.

DISKPART> list partition

  Partition ###  Type              Size     Offset
  -------------  ----------------  -------  -------
  Partition 1    System             100 MB  1024 KB
  Partition 5    Dynamic Reserved  1024 KB   101 MB
  Partition 2    Reserved            15 MB   102 MB
  Partition 3    Dynamic Data       126 GB   117 MB
  Partition 4    Recovery           611 MB   126 GB

DISKPART> select partition 4

Partition 4 is now the selected partition.

DISKPART> assign letter=p

DiskPart successfully assigned the drive letter or mount point.

DISKPART> select disk 1

Disk 1 is now the selected disk.

DISKPART> list partition

  Partition ###  Type              Size     Offset
  -------------  ----------------  -------  -------
  Partition 1    System             100 MB  1024 KB
  Partition 5    Dynamic Reserved  1024 KB   101 MB
  Partition 2    Reserved            15 MB   102 MB
  Partition 3    Dynamic Data       126 GB   117 MB
  Partition 4    Recovery           612 MB   126 GB

DISKPART> select partition 4

Partition 4 is now the selected partition.

DISKPART> format quick fs=ntfs label="winRE"

DISKPART> assign letter=s

exit

c:\windows\system32> robocopy p:\ s:\ /e /r:0
Finally, the drive letters can be removed again:
C:\WINDOWS\system32>diskpart

Microsoft DiskPart version 10.0.22000.653

Copyright (C) Microsoft Corporation.
On computer: TEST

DISKPART> select volume s

Volume 2 is the selected volume.

DISKPART> remove

DiskPart successfully removed the drive letter or mount point.

DISKPART> select volume p

Volume 4 is the selected volume.

DISKPART> remove

DiskPart successfully removed the drive letter or mount point.
If everything has worked so far and the C partition is in sync, even the primary disk can be removed. The secondary disk then reports an error, but the computer can still be started with "F9".
Worst Case: Failure of the primary disk.
To simulate a disk failure, I removed the primary disk and set the boot order in the BIOS to the 2nd disk.
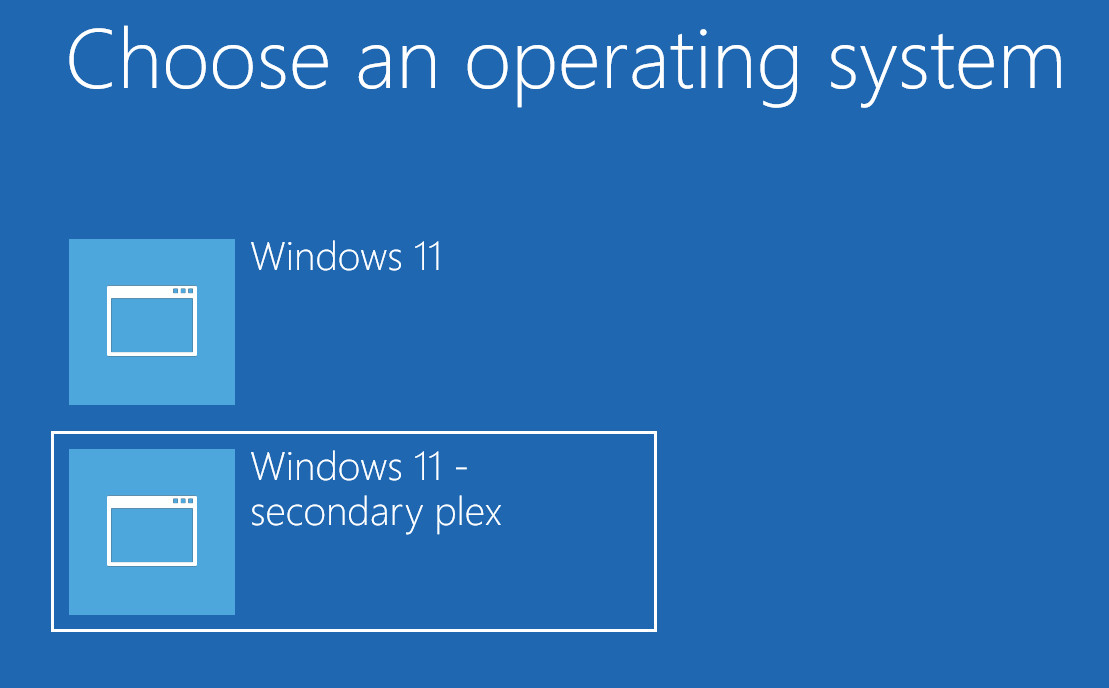
I have tried a few things and tested the procedure described here several times. If you follow all the steps described when creating, you should be able to boot the computer at this point with F9. If the PC still does not boot, the Windows setup media can be used to boot or repair the EFI partition: Windows 10 / 11 - Download Installation - DVD or USB Boot. Using the Windows boot medium, it is even possible to subsequently create an EFI system partition for booting. The EFI partition only has to find space on the first 2.2 TB of the boot hard disk. For the creation of the EFI partition, see : Change Windows 10 BIOS (Legacy) to UEFI Boot.
After starting the PC, the disk management shows us the lost disk:

If the disk is permanently unavailable, it can be permanently removed with "Remove Mirror":


In principle, we are now back at the beginning of the article, accordingly an additional hard disk can again be used for mirroring:

Repair Boot
So that the computer must not be started permanently with F9, I have corrected the bootfiles using bcdboot:
c:\windows\system32> diskpart
DISKPART> select disk 0
DISKPART> select partition 1
DISKPART> assign letter=y:
exit
y:
cd EFI\Boot
Y:\EFI\Boot>bcdboot c:\windows /s y: /f UEFI
Boot files successfully created.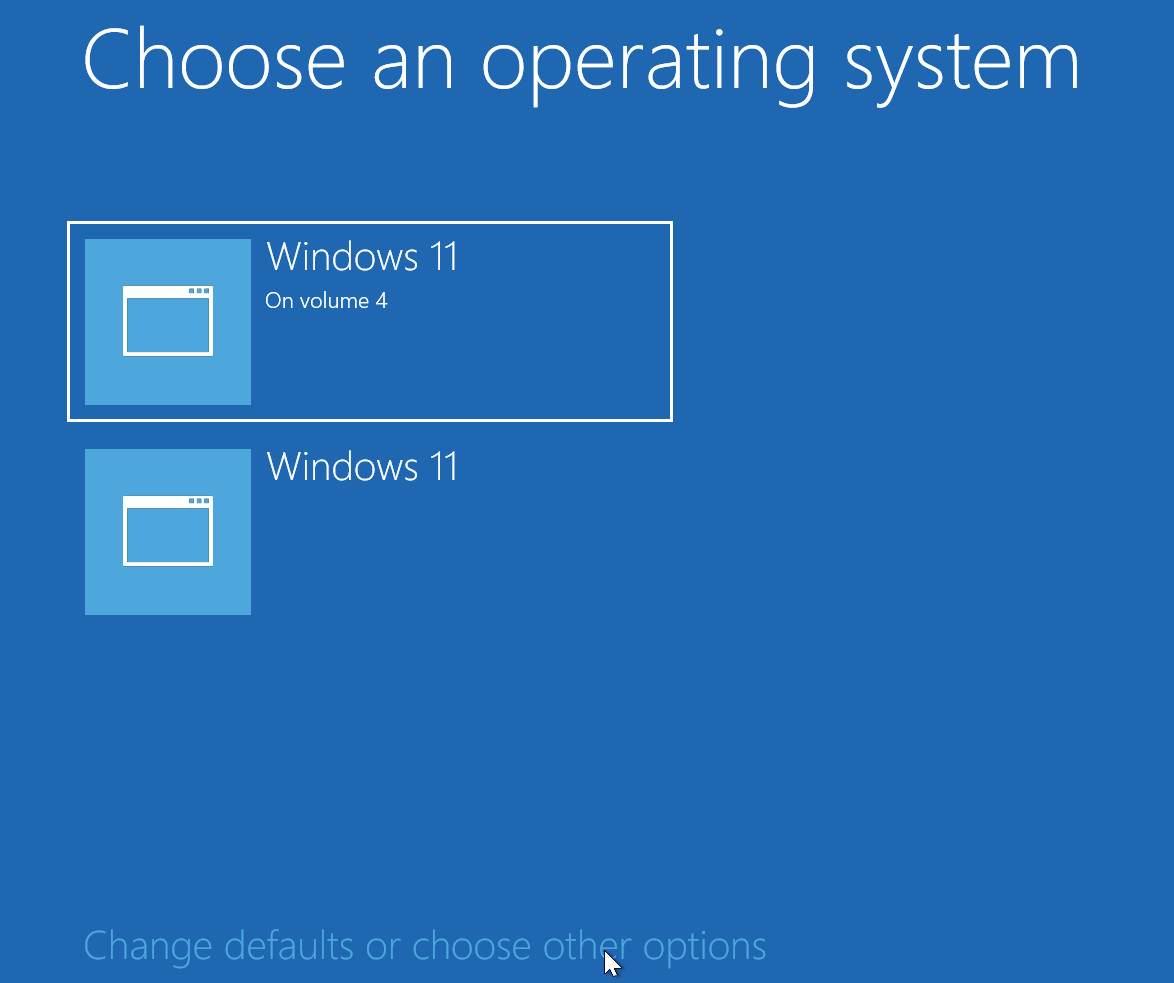

YouTube Video
The content of this article is covered in the following YouTube video:
FAQ
What is a hard disk mirroring?
In a hard disk mirroring, the data is written to two hard disks simultaneously, also called RAID1. The content of the two hard disks is identical at all times.
What is the difference between hard disk cloning and hard disk mirroring?
The difference between cloning and mirroring is that during the cloning process the content is transferred once to another hard disk. With mirroring, on the other hand, the content is written to two hard disks simultaneously during operation. For this purpose, two hard disks are installed and permanently synchronized so that the second hard disk can take over if one fails. When cloning a hard disk, a second hard disk is usually only added temporarily so that the original fixed disk can be replaced with another or to create a backup.
Conclusion
Mirroring the system hard disks under Windows 10/11 increases the availability of the PC and even protects against the complete failure of the primary hard disk. In addition, disk mirroring provides a possibility to transfer the data of one disk to another disk on the fly, similar to cloning a hard disk: Clone Disk, Copy Disk, Create Image, Tools..
 ({{pro_count}})
{{percentage}} % positive
 ({{con_count}})
THANK YOU for your review!
Questions / Comments
(sorted by rating / date) [all comments (best rated first)]
DISKPART> list partition

  Partition ###  Type              Size     Offset
  -------------  ----------------  -------  -------
  Partition 1    System             100 MB  1024 KB
  Partition 5    Dynamic Reserved  1024 KB   101 MB
  Partition 2    Reserved            15 MB   102 MB
  Partition 3    Dynamic Data       126 GB   117 MB
  Partition 4     Dynamic Data        3GB   126 GB


I was copied but not included recovery 🥹🥹🥹🥹
Can you Please Help Me

DISKPART> list partition

  Partition ###  Type              Size     Offset
  -------------  ----------------  -------  -------
  Partition 1    System             100 MB  1024 KB
  Partition 2    Dynamic Reserved  1024 KB   101 MB
  Partition 3    Reserved            15 MB   102 MB
  Partition 4    Dynamic Data       465 GB   117 MB
  Partition 5    Dynamic Data        86 KB   465 GB
  Partition 6    Recovery           571 MB   465 GB