OctoPi Installation - 3D-Printer Webinterface

A Raspberry Pi with OctoPi installed offers a very easy way to upgrade existing 3D printers.
OctoPrint web interface
The OctoPrint included in OctoPi provides a web interface for controlling the printer and managing the 3D objects. For example, when using a webcam, the print status can be inspected anytime and anywhere. Or, when using a relay, the printer can be switched off automatically after the printing process. Additional temperature monitoring via the Raspberry would also be conceivable.
OctoPi is based on Raspian, accordingly the setup runs very similar to the following article: Raspberry Pi Getting Started
Installation
The installation of the image is done by Win32 Disk Imager again:
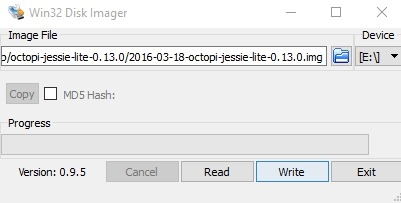 (sourceforge.net/projects/win32diskimager/)
The network settings can be set directly on the SD card, in the file octopi-network.txt:

So it is not necessary to connect the Raspberry to a monitor, the connection is done via SSH:
The user is again: pi, the password: raspberry
The initial settings can be set again with the following command:
sudo crontab -e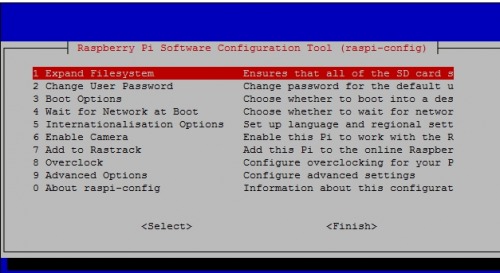
1) Expand Filesystem
2) change Password
if a webcam is connected
6) Enable camera
Deactivate the camera LED
If the camera LED is disturbing, it can be deactivated in the following file: sudo nano /boot/config.txt
disable_camera_led=1Error downloading additional packages: SSLError: bad handshake
If it is not possible to install certain packages at this point, it could be due to a wrong time:
sudo apt-get install python-setuptools python-pipError:
Exception:
Traceback (most recent call last):
File "/home/pi/oprint/local/lib/python2.7/site-packages/pip/basecommand.py", line 209, in main
status = self.run(options, args)
File "/home/pi/oprint/local/lib/python2.7/site-packages/pip/commands/install.py", line 299, in run
requirement_set.prepare_files(finder)
File "/home/pi/oprint/local/lib/python2.7/site-packages/pip/req/req_set.py", line 360, in prepare_files
ignore_dependencies=self.ignore_dependencies))
File "/home/pi/oprint/local/lib/python2.7/site-packages/pip/req/req_set.py", line 577, in _prepare_file
session=self.session, hashes=hashes)
File "/home/pi/oprint/local/lib/python2.7/site-packages/pip/download.py", line 810, in unpack_url
hashes=hashes
File "/home/pi/oprint/local/lib/python2.7/site-packages/pip/download.py", line 649, in unpack_http_url
hashes)

File "/home/pi/oprint/local/lib/python2.7/site-packages/pip/download.py", line 842, in _download_http_url
stream=True,
File "/home/pi/oprint/local/lib/python2.7/site-packages/pip/_vendor/requests/sessions.py", line 480, in get
return self.request('GET', url, **kwargs)
File "/home/pi/oprint/local/lib/python2.7/site-packages/pip/download.py", line 378, in request
return super(PipSession, self).request(method, url, *args, **kwargs)
File "/home/pi/oprint/local/lib/python2.7/site-packages/pip/_vendor/requests/sessions.py", line 468, in request
resp = self.send(prep, **send_kwargs)
File "/home/pi/oprint/local/lib/python2.7/site-packages/pip/_vendor/requests/sessions.py", line 597, in send
history = [resp for resp in gen] if allow_redirects else []
File "/home/pi/oprint/local/lib/python2.7/site-packages/pip/_vendor/requests/sessions.py", line 195, in resolve_redirects
**adapter_kwargs
File "/home/pi/oprint/local/lib/python2.7/site-packages/pip/_vendor/requests/sessions.py", line 576, in send
r = adapter.send(request, **kwargs)
File "/home/pi/oprint/local/lib/python2.7/site-packages/pip/_vendor/cachecontrol/adapter.py", line 46, in send
resp = super(CacheControlAdapter, self).send(request, **kw)
File "/home/pi/oprint/local/lib/python2.7/site-packages/pip/_vendor/requests/adapters.py", line 447, in send
raise SSLError(e, request=request)
SSLError: ("bad handshake: Error([('SSL routines', 'SSL3_GET_SERVER_CERTIFICATE', 'certificate verify failed')],)",)
Power GPIO
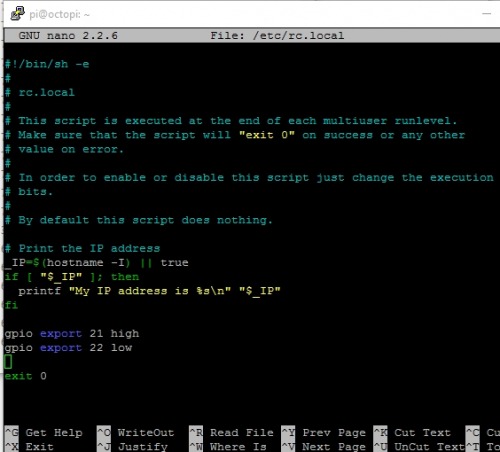
Here is just a screenshot; for wiring

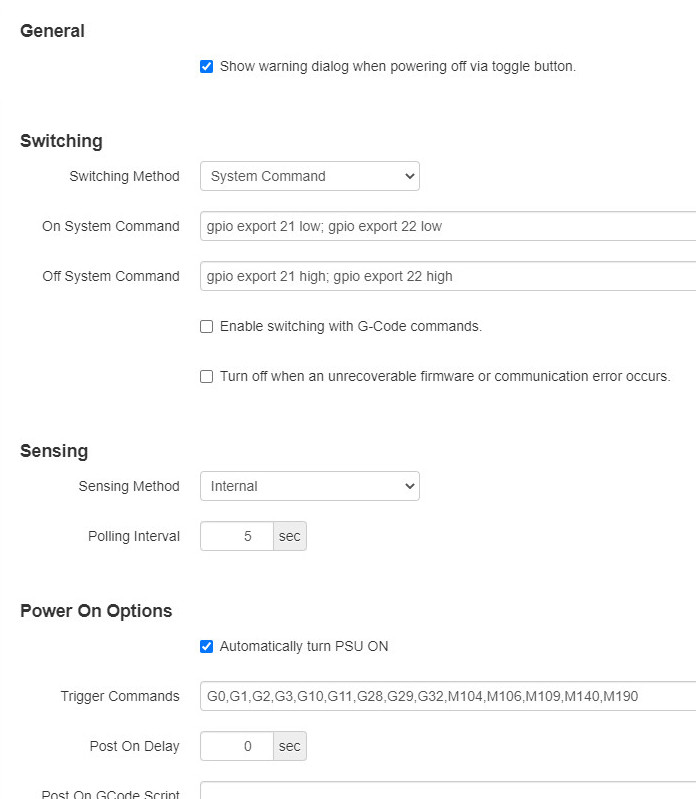
PSU Control
via the plugin PSU-Control the power supply to the printer can be interrupted with the help of a relay.

I have set the following settings for it:
Always the right time: NTP
The current time can be retrieved from the Internet via NTP. To do this, set / check the current time zone:
pi@octopi:~ $ sudo dpkg-reconfigure tzdataInstall NTP
pi@octopi:~ $ sudo apt-get purge ntppi@octopi:~ $ sudo apt-get update
pi@octopi:~ $ sudo apt-get install ntpdateThe following command can then get and set the time via NTP:
ntpdate -s 0.de.pool.ntp.orgTo make the Raspi update the time at every startup, I added the following line to the rc.local file:
pi@octopi:~ $ sudo nano /etc/rc.localntpdate -s 0.de.pool.ntp.orgAlternatively, ntp can also be updated via crontab:
sudo crontab -e@reboot sudo ntpdate -s 0.de.pool.ntp.orgSyncthing
To sync data to other devices, I set up Syncthing on the Raspberry, see also: jankarres.de/2014/09/raspberry-pi-bittorrent-sync-alternative-syncthing-install/
pi@octopi:~ $ sudo mkdir /etc/syncthing
pi@octopi:~ $ cd /etc/syncthing
pi@octopi:/etc/syncthing $ sudo wget https://github.com/syncthing/syncthing/releases/download/v0.14.23/syncthing-linux-arm-v0.14.23.tar.gz
pi@octopi:sudo tar xvzf syncthing-linux-arm-v0.14.23.tar.gz

pi@octopi:/etc/syncthing $ sudo rm syncthing-linux-arm-v0.14.23.tar.gz
pi@octopi:/etc/syncthing $ sudo mv syncthing-linux-arm-v0.14.23/syncthing ../
pi@octopi:/etc/syncthing $ sudo chmod -x syncthing
sudo ln -s /etc/syncthing/syncthing /usr/bin/syncthing
nano ~/.config/syncthing/config.xml<gui enabled="true" tls="false" debugging="false">
<address>192.168.0.115:8384</address> Autostart:
sudo nano /etc/init.d/syncthing
UploadFolder:
chmod 777 -R /home/pi/.octoprint/uploads/Communication stuck
Communication error
There was an error communicating with the printer. Please consult the terminal output and octoprint.log for details. Error: Printer keeps requesting line ??? again and again, communication stuck
The problem was apparently caused by the plugin "DisplayLayerProcess", either because I wanted to show the file name on the display and at a certain point the transmitted message became too long, or because too many status messages were sent.
Solution: Printer display without file name [current_print_filename] and output interval to 10 seconds:


Conclusion
OctoPi and a Raspberry Pi are an easy way to add a web interface to almost any 3D printer. See also: Prusa i3 based printers: improvements and adjustments
 ({{pro_count}})
{{percentage}} % positive
 ({{con_count}})